Alpha 1 Setup by Mark Galer

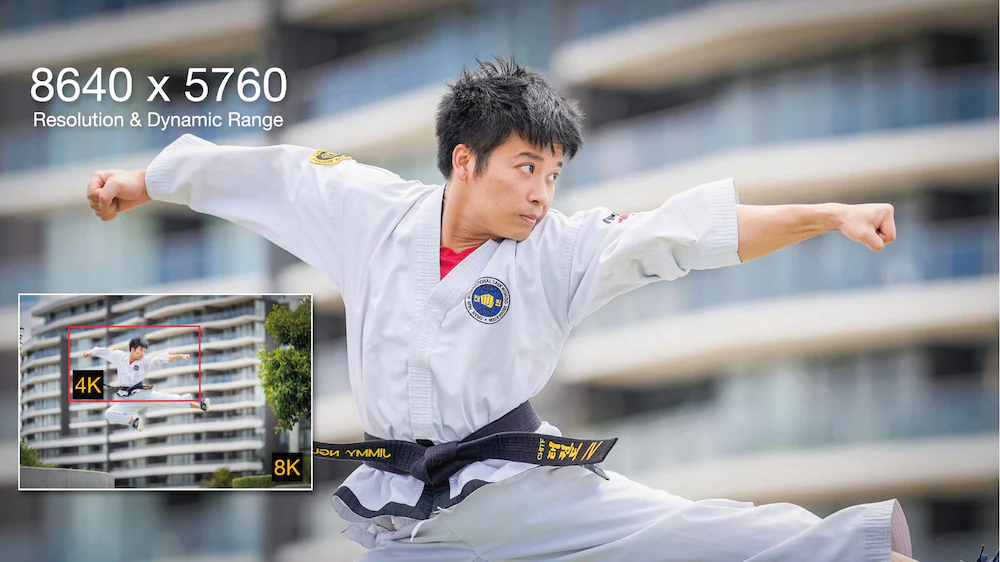
The Alpha 1 is a camera that can turn its hand to every aspect of a commercial photographer’s workflow. It’s ultra-high-resolution sensor will appeal to commercial advertising photographers, art photographers (who need to generate very large prints) and sports/action/bird photographers who often need to crop aggressively to ensure their subject fills the frame.
Most commercial photographers no longer identify as stills or video photographers. In an era where multi-skilling is the name of the game, the contemporary commercial photographer must be able to turn their hand to anything their client asks of them.
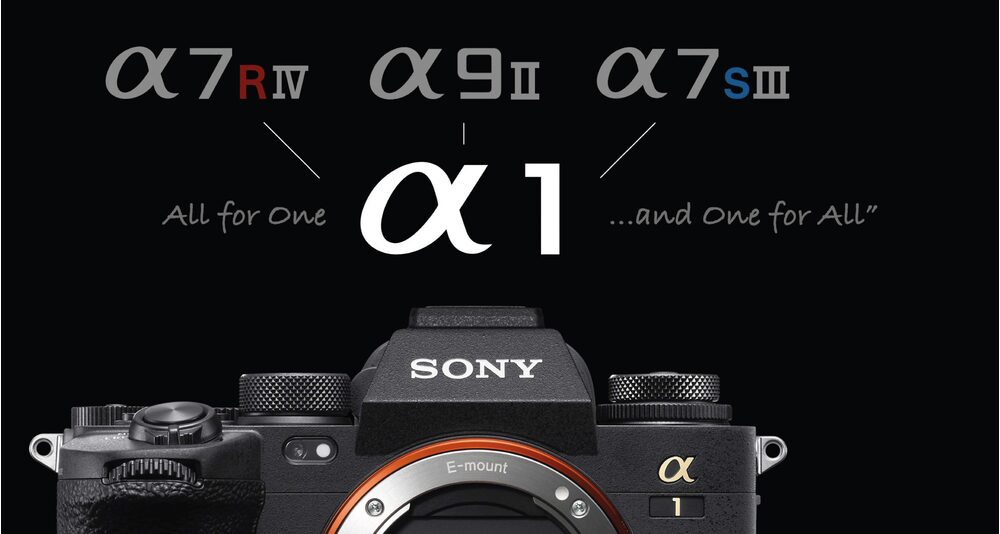
Sony has crafted a camera that meets all of these needs and fulfils all of these roles. Not only does the camera capture stunning 4K quality movies, it’s ultra-high-resolution sensor also opens up the world of 8K movie capture. The Alpha 1 really is an “all-for-one and one-for-all’ technical masterpiece and a no-compromise camera for the contemporary commercial photographer.
As this camera will be expected to turn its hand to completely different genres, the Alpha 1 photographer will value the ability to quickly change groups of camera settings with the minimum of fuss.
The Alpha 1 offers an unprecedented level of customisation and automation that makes switching between stills, action and movies easy to execute in just a second or two, with just a turn of a dial and/or the press of a button. This setup guide will illustrate how this can all be made possible, so that the camera is tailored to fit your own creative workflows.
With over 50 pages of menus the photographer may, at first, be daunted at the prospect of configuring the Alpha 1 camera with the optimum settings, to capture high quality stills and movies. Once the initial camera setup is complete, however, the photographer will find themselves rarely entering the main menus looking to change a setting.
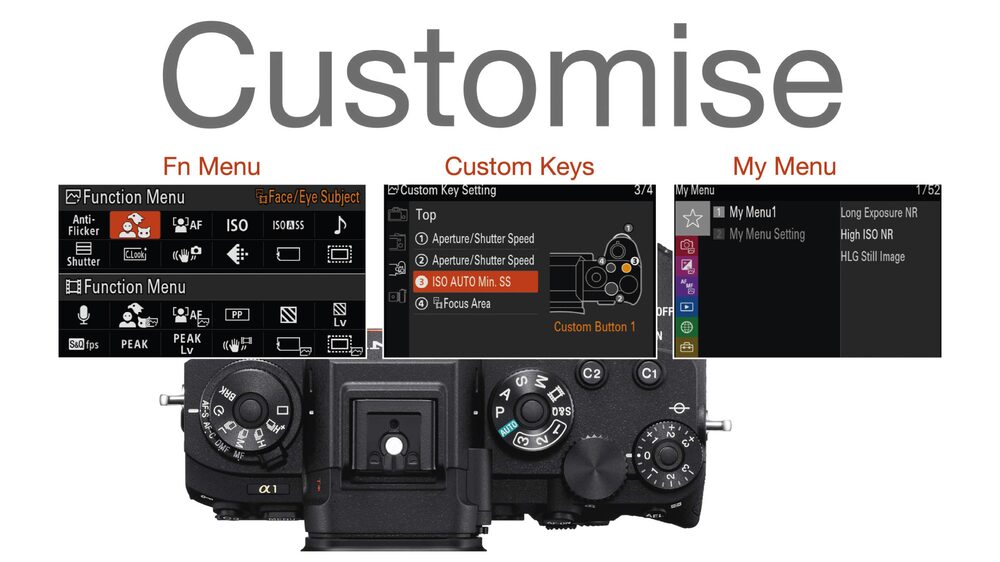
This is because twenty-four of your most frequently used settings can be assigned to your own customisable Fn menu that can be accessed by simply pressing the Fn button.
These settings can even be changed while using the Finder when the camera is at your eye. The buttons and dials can be reassigned to enable you to quickly change your preferred settings without even entering the menus at all.
Infrequently used menu items that you sometimes find yourself looking for can be stored in your own custom My Menu. A button can be assigned to enable you to jump straight to your own custom menu, completely bypassing the main menu.
Perhaps the most powerful feature, for a photographer who finds themselves shooting across a broad range of genres, is the ability to register and recall entire groups of settings, so that you move between shooting portraits, action, landscape and movies by turning just a couple of dials.
If you are familiar with older Menu structures found on Sony Alpha cameras you will quickly realise Sony has changed things around a little.
The changes are for the better, but the relocation of some Menu options may, initially, be a little frustrating. Trust me when I tell you these changes were necessary, and the logic of the current structure will soon become apparent.
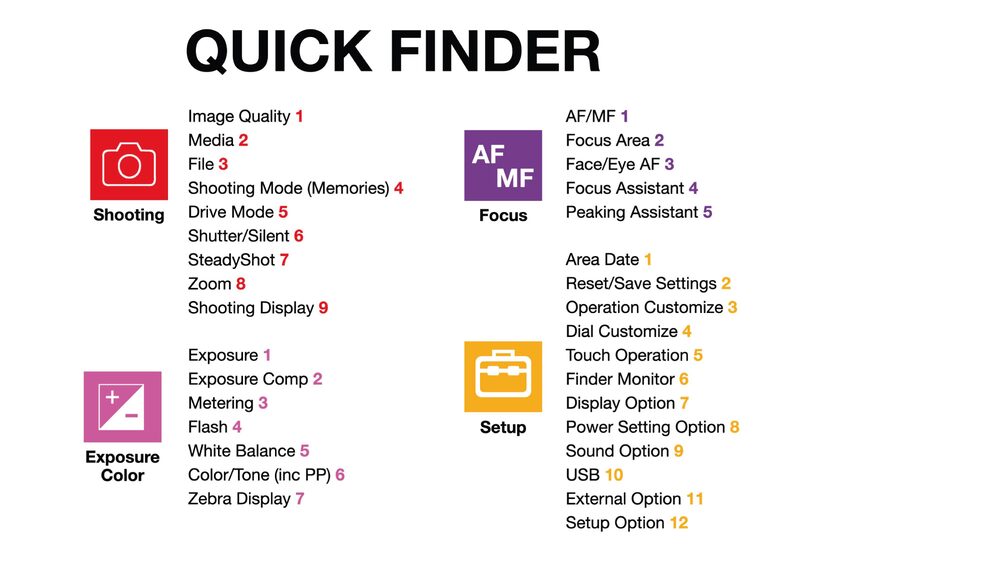
In the illustration above I have highlighted some of the more frequently used Menu items along with the page number in that section, the name of the Menu plus the colour and identifying icons of that section. As I move through this setup guide, I will try to help you locate the menu items you are looking for by using these location references (colour, icon and page number).
When you press the Fn (Function) button on the back of the camera you will be presented with twelve default menu options for either Stills or Movies, depending what position the Shoot Mode dial (on the top right-hand side of the camera), is set to.
If you have Touch Operation enabled (press the C4 key if it is not) you will be able to change any of the settings associated with these menus by touching the options. If you do not, you will need to use the Control Wheel and Center button to navigate and select the menus.
The default options Sony have chosen are unlikely to be the ones that are best suited to meet the needs of your own creative workflows. The default Fn items also duplicate some things that have been assigned to existing dials and that cannot be changed via the Fn menu, e.g., the Drive Mode and the Exposure Mode when shooting stills.
Focus Area is, by default, assigned to the C2 button on the top of the camera, Exposure Compensation has its own dedicated dial on the top of the camera, ISO can be changed by pressing the right side of the Control Wheel.
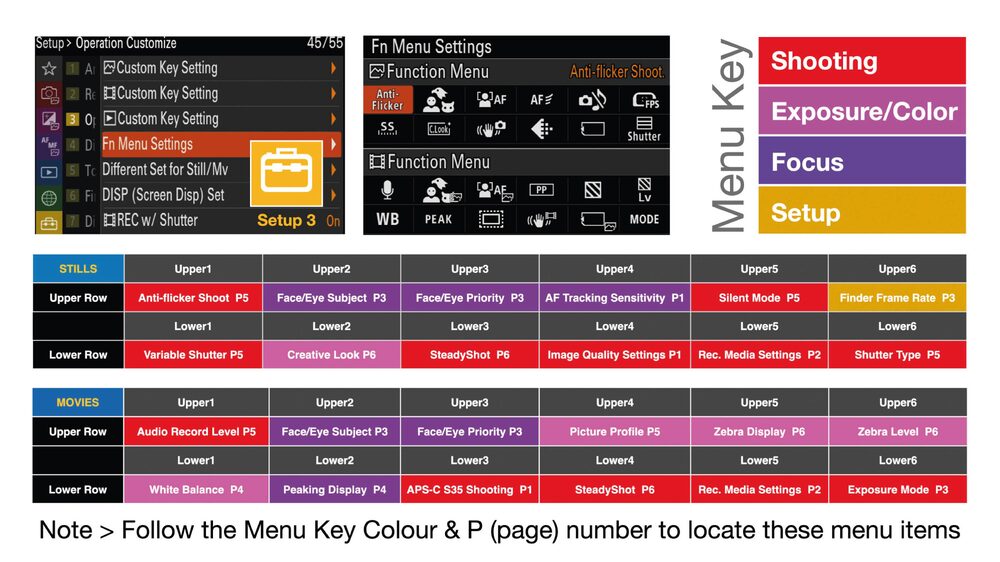
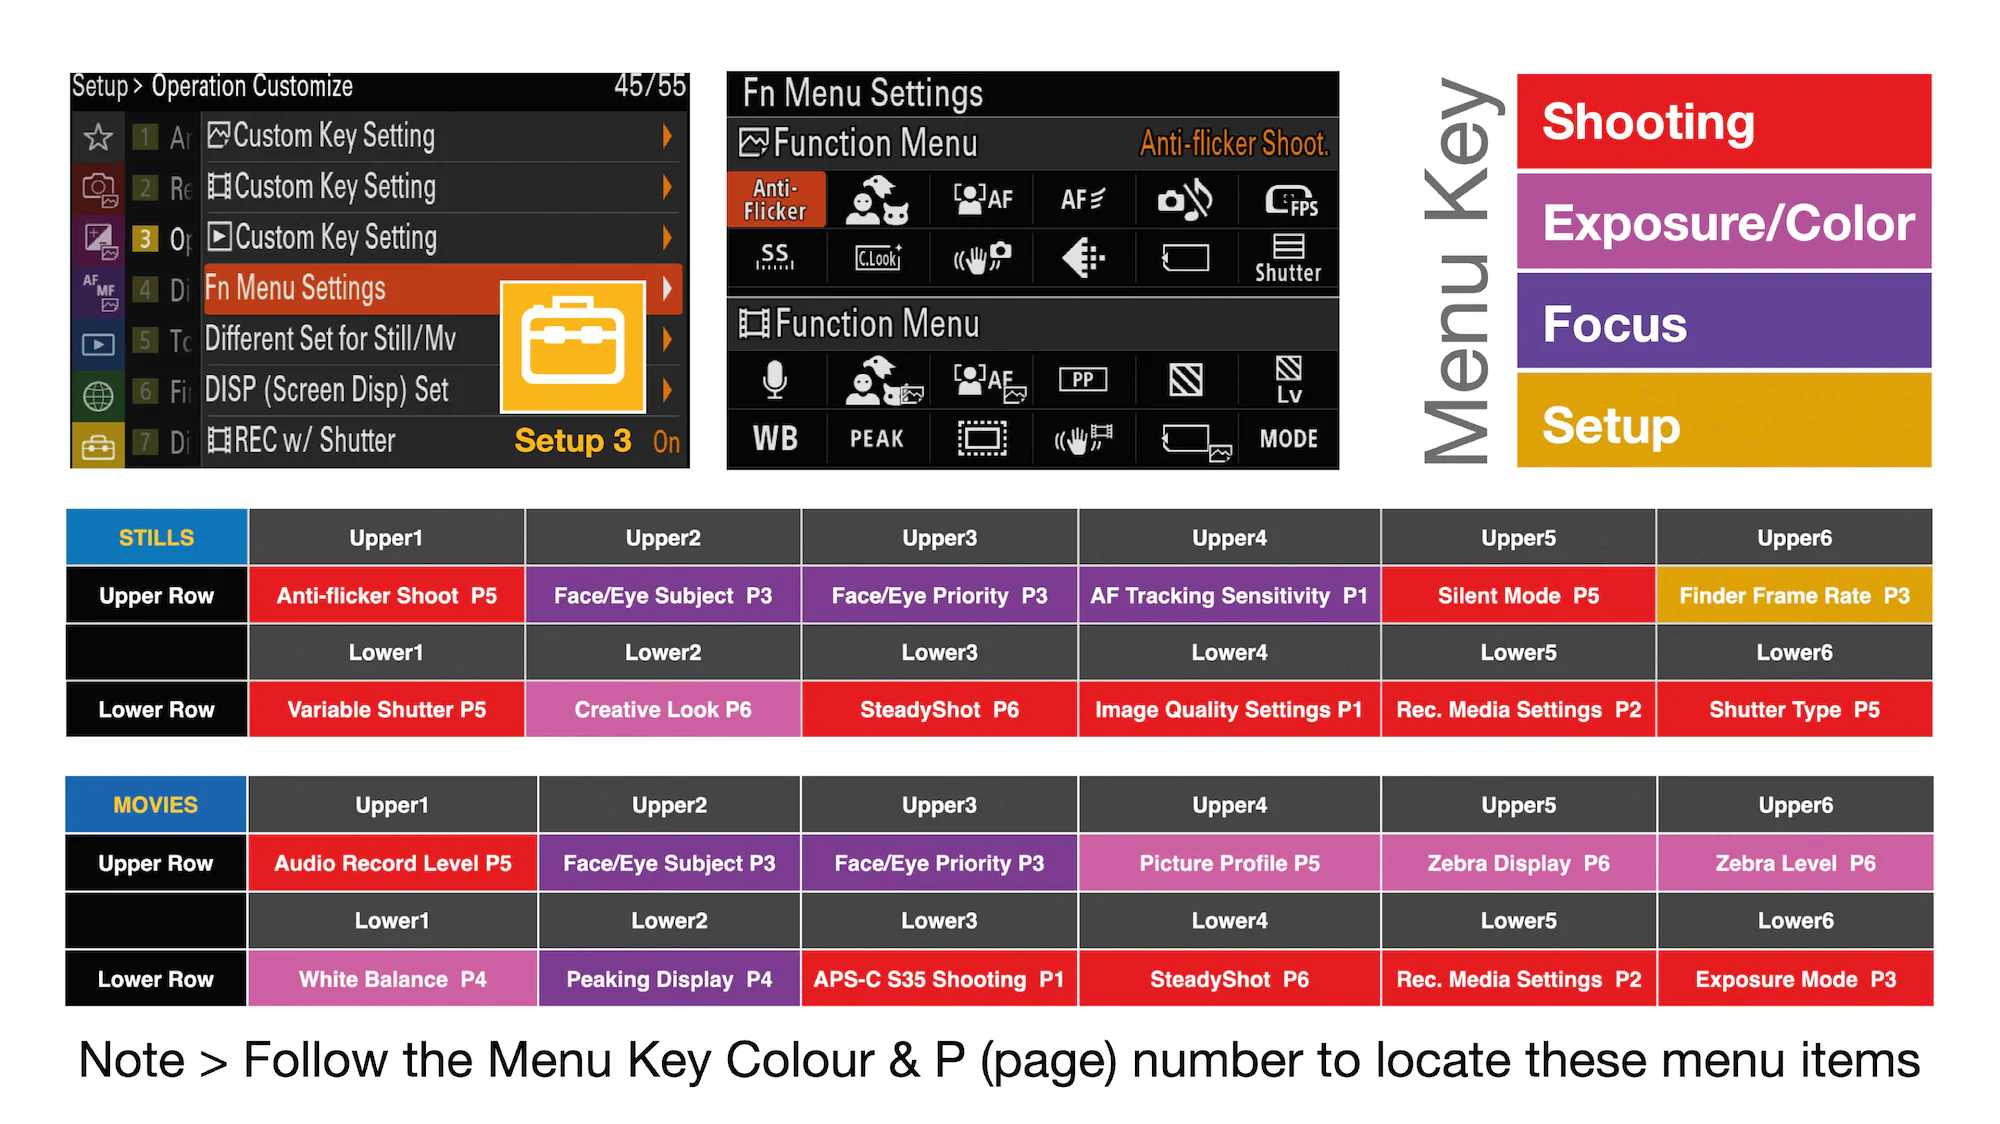
As you can see, we can change many of these default Fn menu options without losing any functionality, so I recommend making this the first thing you do to customise on your own Alpha 1 camera. In the illustration above I have listed my preferred twenty-four Fn menu options that you may like to consider when changing your own Fn menu.
I have outlined why I need quick access to these menu items in the section below. If you decide to add any of my suggestions, I have listed the menu section and page number to help you quickly locate the recommended option, e.g., Red P1 is the first page in the Shooting menu.
Fn Stills
Anti-flicker Shoot. and Variable Shutter (Upper and Lower 1)
These options provide me with the ability to remove banding from my images. This banding (visible stripes running across my image) could be a result of photographing with low-frequency light sources, such as Fluorescent Lights (Anti-flicker shoot), or high-frequency LED lights (Variable Shutter). I do not leave Anti-flicker permanently switched on as this will lower the resolution of the Finder.
Face/Eye Subject and Face Eye Priority (Upper 2 & 3)
I need quick access to switch the Face/Eye subject between Humans, Animals and Birds, depending on what I am photographing. Occasionally I don’t want the camera to prioritise the eye of a face, so will need to disable the Face/Eye Priority altogether, e.g., prioritising the outstretched hand of a boxer rather than the boxer’s face.
AF Tracking Sensitivity (Upper 4)
I usually have the Tracking Sensitivity set to 1 (Locked on) so the focus is as ‘sticky’ as possible (to ensure the focus stays with my target subject even when it passes behind obstacles momentarily), but I will occasionally raise the Tracking Sensitivity towards 5 (Responsive), if I need the camera to respond (switch) to a different subject more quickly. 1 is usually preferred by sports photographers when tracking an individual player, but number 5 may be more appropriate in a wildlife situation where the animal that comes to the front of the pack or herd (and obscures your original target) is preferred.
Silent Mode (Upper 5)
Shooting with the electronic shutter can be a silent affair (the sound of the shutter is optional), but it is handy having a Silent Mode menu option to make sure all camera noises are switched off when working in stealth mode is required. Useful for both Wildlife and some Pro Sports scenarios.
Finder frame Rate (Upper 6)
The ‘State-of-the-Art’ Finder on the Alpha 1 can be either an ultra-high-resolution Finder, or a Finder that delivers an ultra-fast refresh-rate (essential for tracking rapidly moving subjects where you are panning the camera really quickly). It cannot, however, be both at the same time. The ability to quickly increase or decrease the frame rate puts you in control to ensure your viewing experience is always optimised for the task in hand.
Creative Look (formerly known as ‘Creative Style’ – Lower 2)
These settings do not have any effect on Raw files being captured but are essential when you are optimising the look of JPEG files. This is a useful control when you are shooting both Raw and JPEGs and you quickly need to share a photo (the JPEG) with a client or post it to social media.
SteadyShot (Lower 3)
SteadyShot is usually set to On by default, but may need to be switched to Off when the camera is mounted on a tripod (especially when using a non-Sony lens), or when the camera is being moved rapidly to capture fast action and there is no SteadyShot Mode 2 or Mode 3 on the lens.
Image Quality Settings (Lower 4)
This option allows me to switch between RAW, RAW & JPEG or JPEG, and also the type of Raw file (Compressed or Uncompressed).
Record Media Settings (Lower 5)
This option allows me to change the Record Media Settings, allowing me to choose which memory card to capture to and enable the Auto Switch option (so the camera starts recording to the second card when the first card is full). Alternatively, it allows me to sort Raw files to one card and JPEGs to the second or shoot the same file format to both cards ‘Simultaneously’ (when a backup file is required – usually as an insurance policy against the unlikely event of a card failure).
Note > An additional Fn menu can be made available as it is possible to jump between Image Quality Settings and Record Media Settings when using either of these two options.
Shutter Type (Lower 6)
The Alpha 1 rarely needs to use its mechanical shutter, but it is handy being able to make this switch when it is required, e.g., to access the faster 1/400 second flash sync speed that is available when shooting flash with the mechanical shutter.
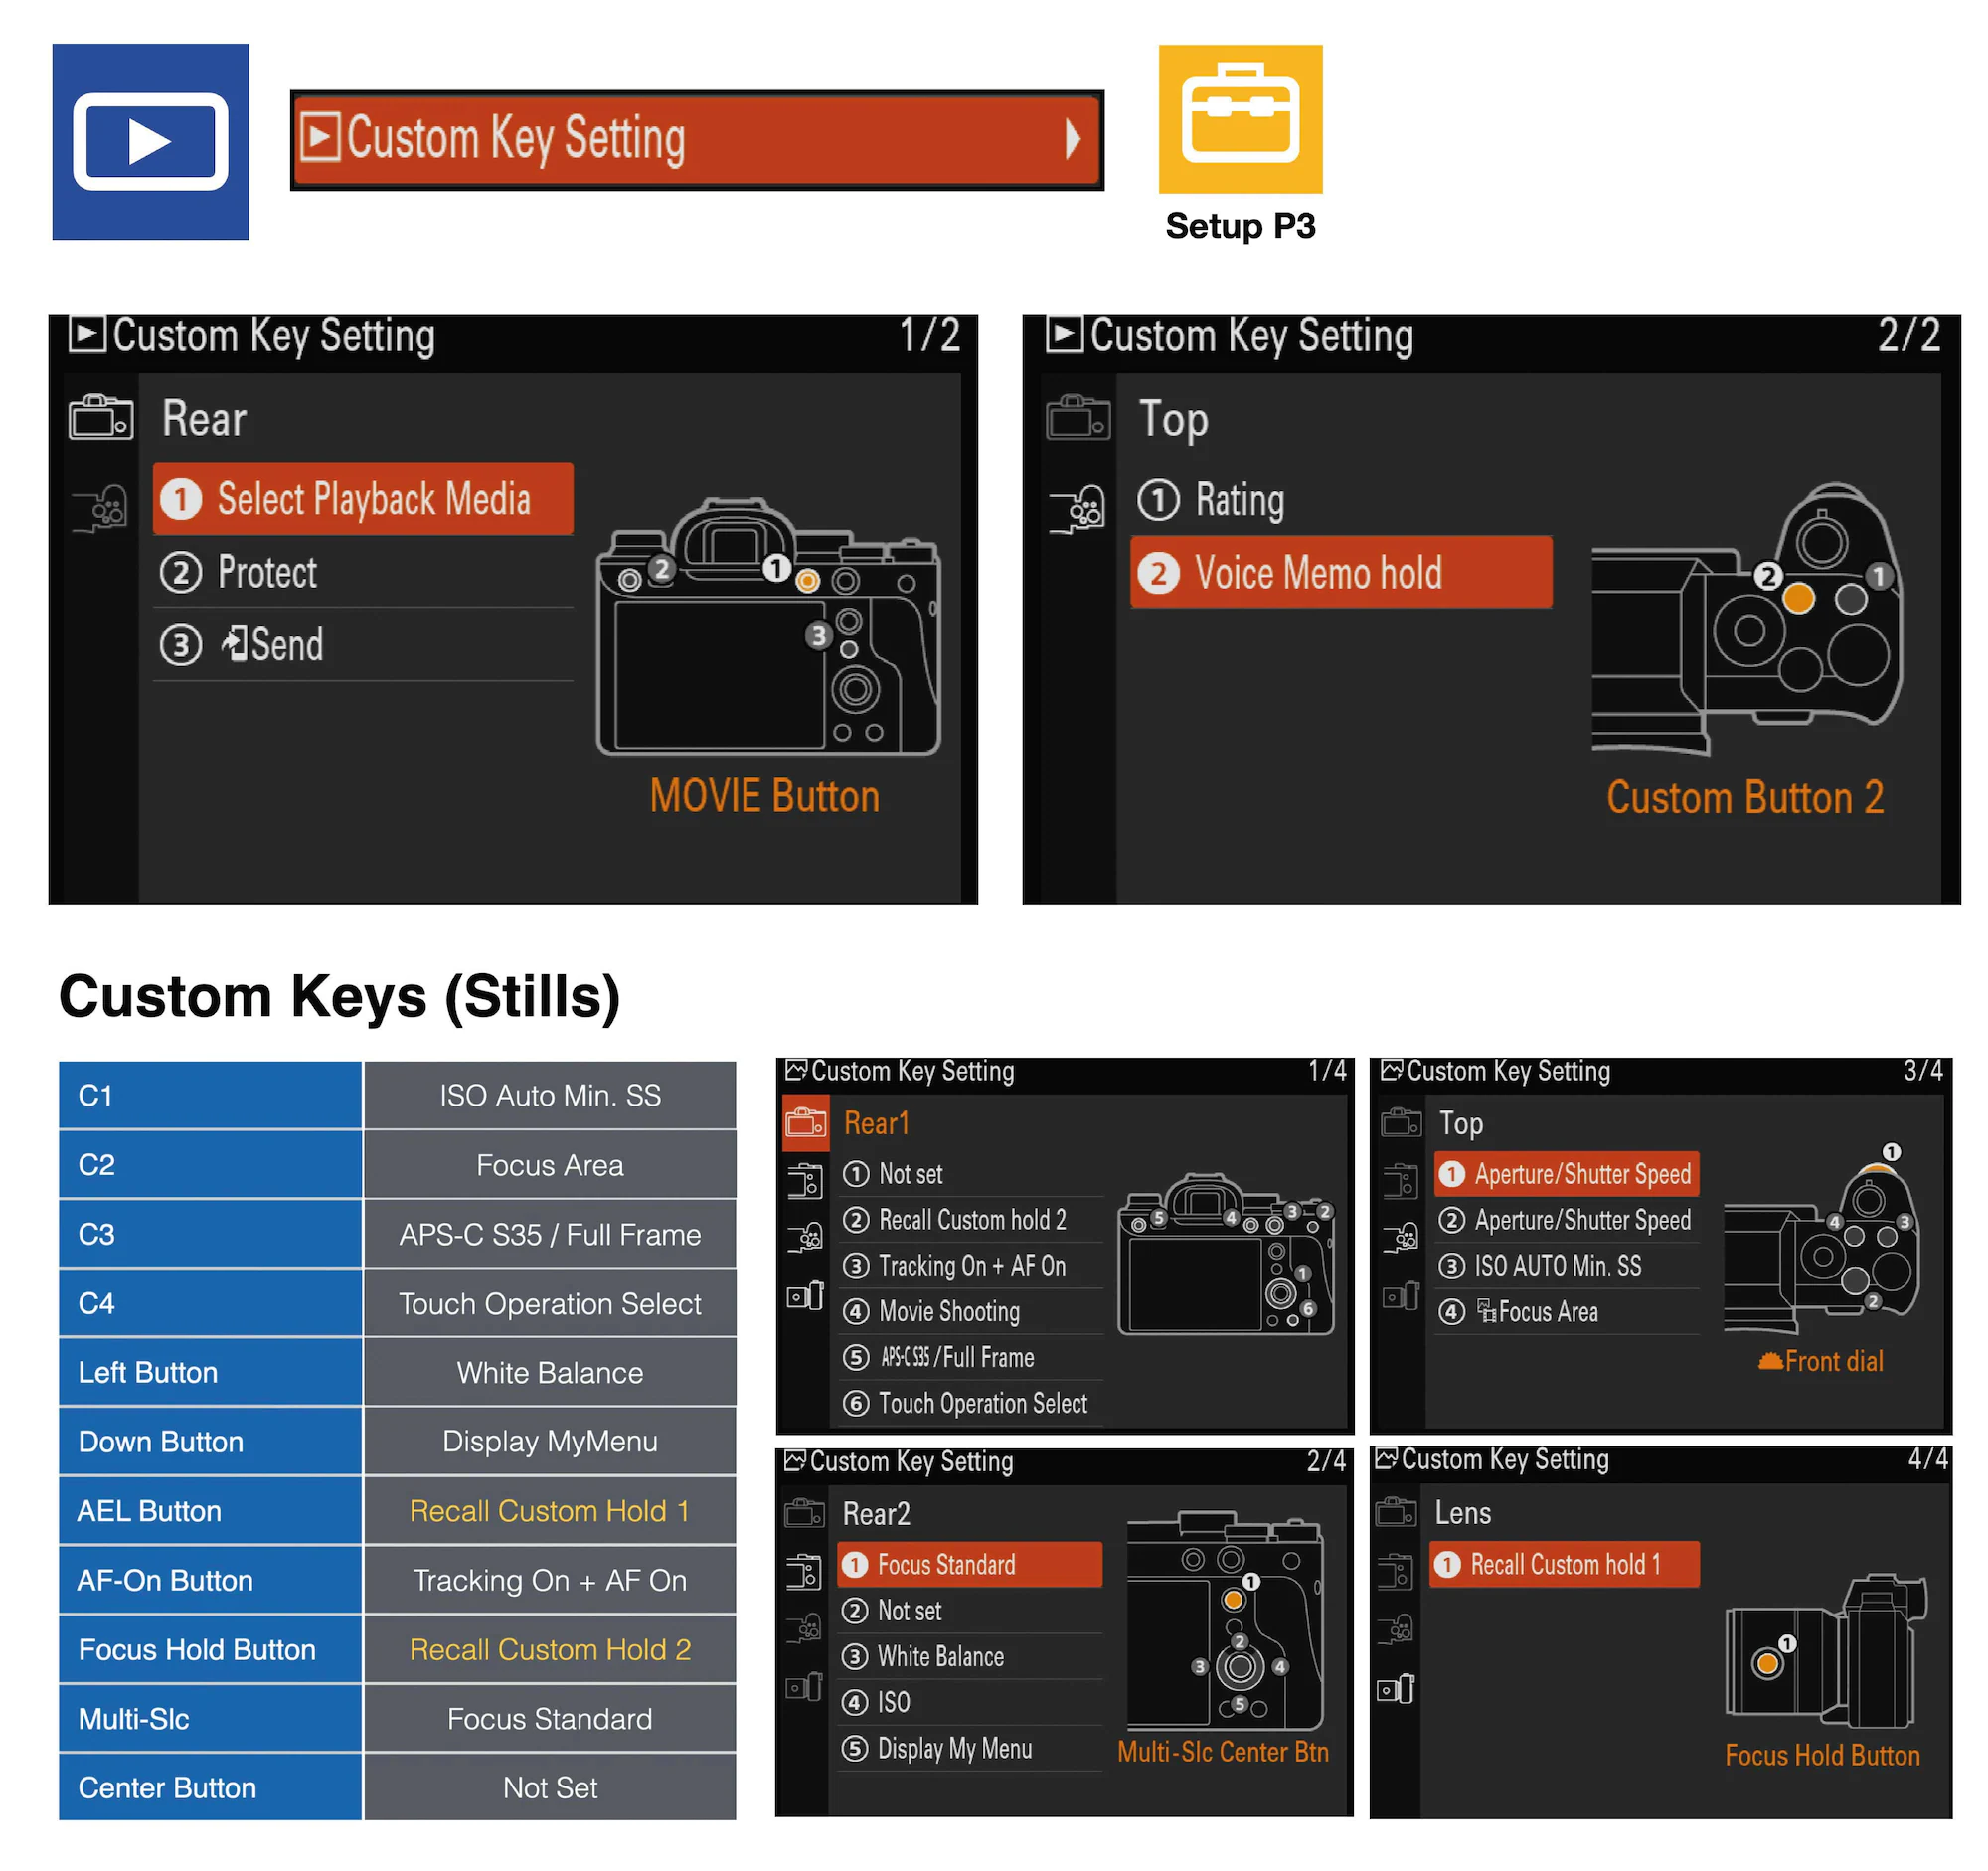
Note > I have assigned White Balance, APS-C shooting, ISO, ISO Auto Minimum Shutter Speed, Focus Area, Focus Standard, Touch Operation and Display My Menu to Custom buttons (keys) in Stills Mode and Select Playback Media, Rating and Voice Memo to Custom buttons in Playback mode.
Fn Movies
Audio Record Level (Upper 1)
This allows me to quickly fine-tune the audio recording levels while shooting movies.
Face/Eye Subject and Face Eye Priority (Upper 2 & 3)
As for Stills
AF Tracking Sensitivity (Upper 4)
As for Stills
Zebra Display (Upper 5)
Enabling Zebras allows me to monitor the exposure, so that I can ensure any highlights are protected from possible overexposure.
Zebra Level (Upper 6)
Setting the Zebra Level allows me to switch between using the Zebras as an over-exposure warning to confirmation that the highlights are exactly where they need to be.
White Balance (Lower 1)
Provides quick access to adjusting the White Balance for times when the ambient colour temperature has changed.
Peaking Display (Lower 2)
Peaking Display (Lower 2): Peaking assists in ensuring accurate focus is achieved when using manual focus to capture movies.
APS-C S35 Shooting (Lower 3)
I have this assigned to a Custom Button for Stills, but don’t need to switch that quickly when shooting movies. APS-C S35 Shooting can be used for recording 4K movies, but not 8K movies. It will narrow the angle of view of the lens you are using (cropping in closer to your subject) and produces a slightly sharper 4K video as there is no pixel binning, or line skipping required when working with the reduced S35 (Super 35) resolution.
SteadyShot (Lower 4)
As for Stills
Record Media Settings (Lower 5)
As for Stills
Exposure Mode (Lower 6)
This is a useful feature to have in the Fn menu when recording movies, as you cannot switch between Aperture Priority, Shutter Priority or Manual Exposure Modes when recording movies using the Shoot Mode dial (which has been set to Movies or S&Q and can’t be moved again to choose the exposure mode when shooting movies).
Custom Key Settings
The ability to customise the keys (sometimes referred to as buttons) can be accessed by going to Menu > Setup > Operation Customize (P3) > Custom Key Settings.
The keys should be reserved for settings you change frequently while shooting. You can change the functionality of the keys depending on whether you are shooting stills, movies or reviewing images in Playback mode.
In the Playback options I recommend adding ‘Select Playback Media’ to a Custom key, as this cannot currently be assigned to the Fn menu. If you don’t assign this function you could find yourself shooting to the memory card that is in Slot 2, while reviewing images from the memory card that is in Slot 1.
If you add Rating to a Custom key, I typically also go into the Playback menu and choose just a ‘single star’ rating. This is enough to quickly identify the images that I have rated on location when reviewing images in Adobe Lightroom. Sports photographers and photojournalists may decide to set up a custom key to initiate FTP transfer while the rest of us might be happy just to use the default setting for the Fn key, which is to transfer an image (or images) to our smart phone. Finally, I find the ability to add a voice memo to a file I am reviewing invaluable, as I never forget a face, but names are definitely not my forté ☺

C1 ISO Auto Min SS
When assigning functions to the Custom keys I have been fairly consistent in what I have chosen to assign to the keys, across most Alpha full-frame cameras I have owned. C1 gets reassigned to ‘ISO Auto Min. Shutter Speed’ as I primarily work in Aperture priority mode but like to nominate a minimum shutter speed (if there is enough ambient light) to ensure my subject does not blur if it moves.
I select 1/250 second when shooting portraits, 1/2000 second when I intend to freeze rapidly moving subjects and the setting called ‘Slower’ when shooting hand-held landscapes (where the camera is braced to minimise the risk of camera shake). The option called ‘Slower’ will allow the camera to choose shutter speeds that are slower than the reciprocal rule, where focal length and shutter speed are matched, e.g., 50mm and 1/50 Second. Choosing Slower from the ISO Auto Min SS options allows the shutter speed to slow to ¼ of the reciprocal rule, e.g., 1/15 second on a 50mm lens (which I know I can hand-hold without the risk of camera shake if I am being careful).
I find the advantages of working with Aperture priority in conjunction with ISO Auto and ISO Auto Min SS (compared to working in Shutter Priority mode), is that the ‘appropriate exposure’ is always protected. If there is not enough light to achieve a shutter speed of 1/500 second, when the ISO has also risen to the upper limit, the camera will choose a slower shutter speed to protect me from underexposing my image.
Historically, I have also found that when choosing Aperture priority to shoot sports, it will ensure the camera won’t choose a small aperture (such as f/22) that, in turn, disables the Phase Detect AF. This has formerly been a risk when capturing slow shutter speed pans when the ambient light is bright. This latter problem has been removed with the Alpha 1 as f/22 is now possible with Phase Detect AF, even when the drive Mode is set to Medium or High.
C2 Focus Area
C2 gets left for Sony’s default of Focus Area. Pressing the C2 key allows me to switch Focus areas while the camera is at my eye, by turning the front and rear dials. When photographers ask me, what focus area I use, I respond by saying, ‘That is like asking what gear I prefer using in my car’. There are multiple Focus Areas for a very good reason, and it is one my most changed settings when working on location.
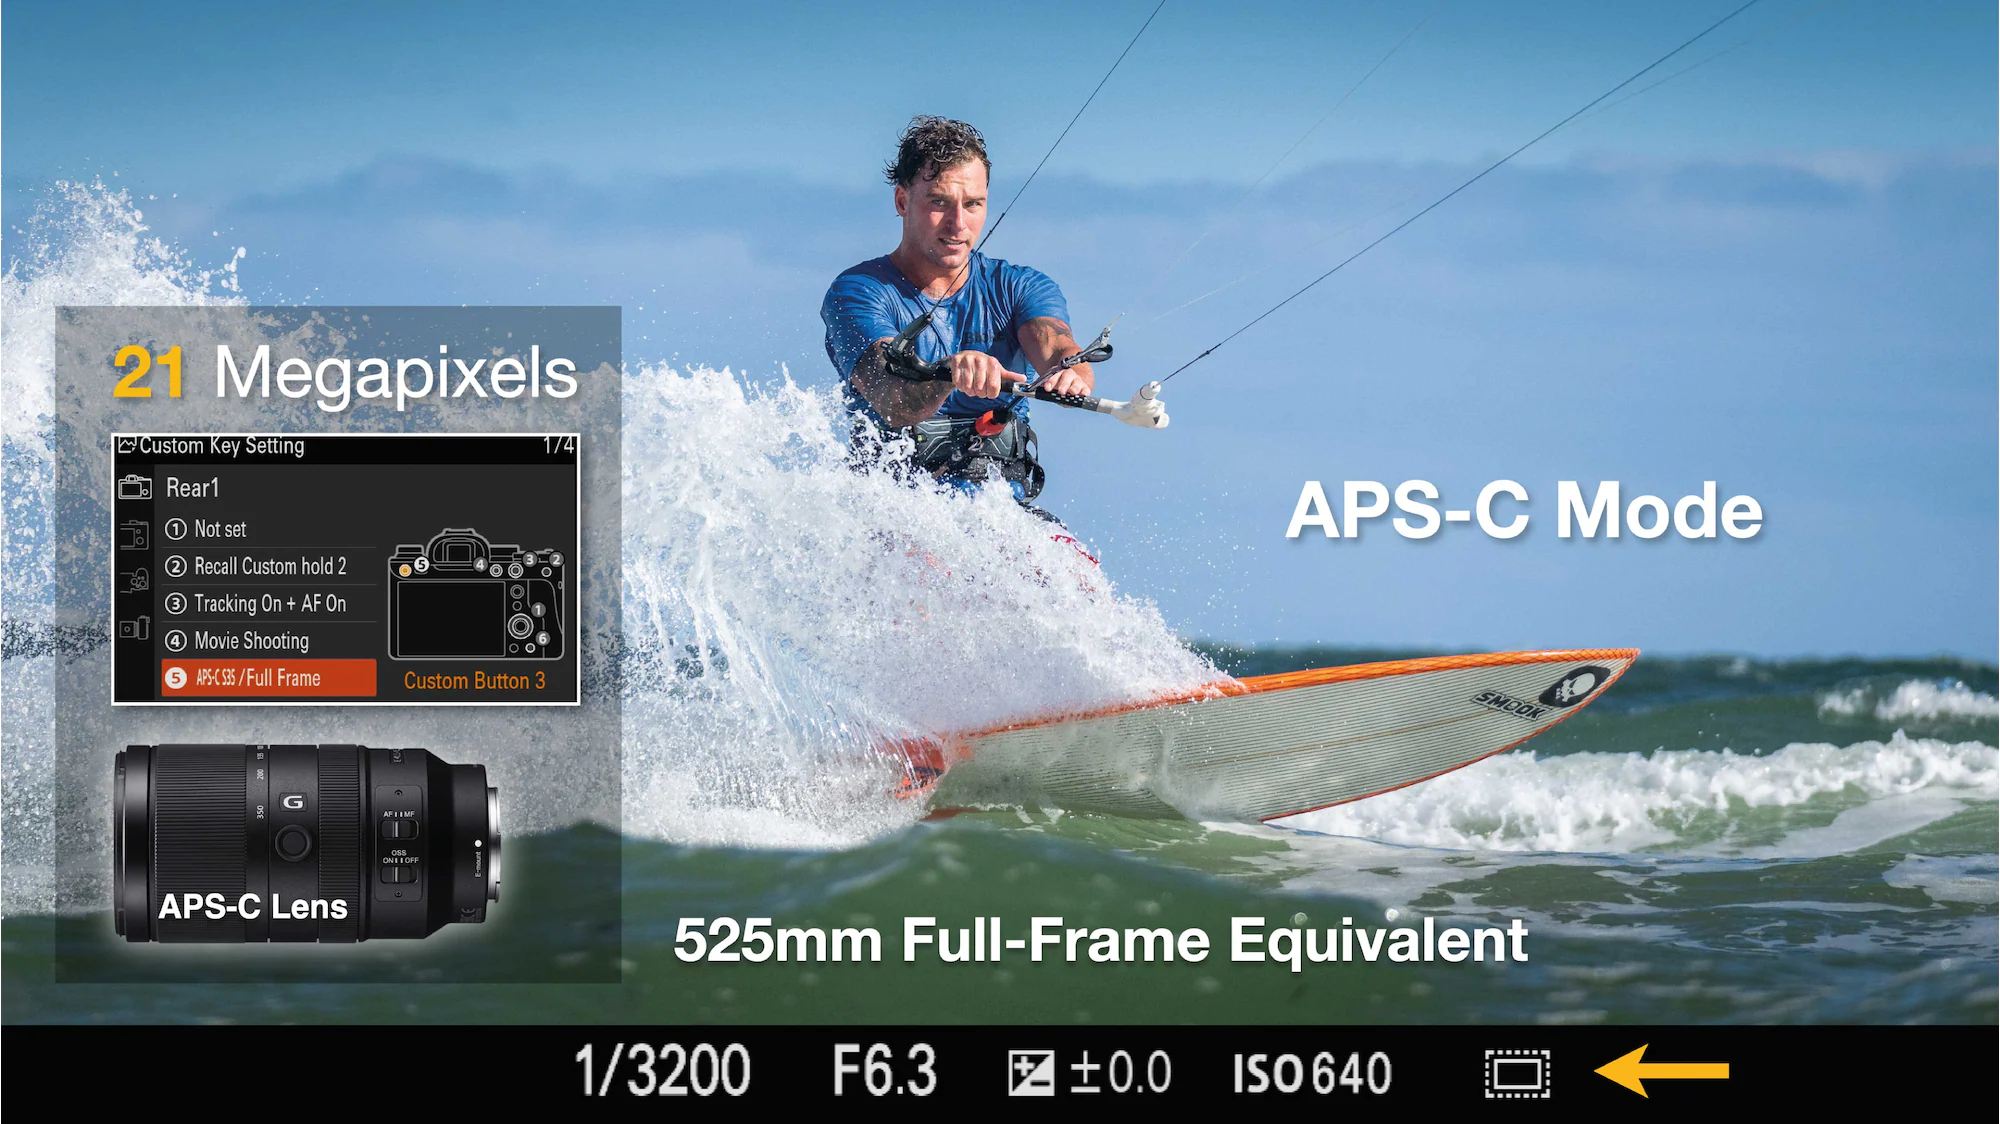
C3 APS-C S35
I have been wary of assigning a custom key to APS-C shooting in previous Alpha cameras, as historically there was no icon to indicate APS-C shooting was activated when shooting with the Monitor or Finder set to the histogram view. APS-C mode effectively crops all of your images in camera.
The resolution of the files drops to 10 Megapixels with cameras using 24-megapixel sensors, 26 Megapixels for the A7RIV and 21 Megapixels for the Alpha 1. The C3 key can easily be pressed accidentally, so a visible icon indicating the camera is cropping all of your images makes a welcome entrance on the Alpha 1. The default for the C3 key is ‘Shutter Type’, but there are now very few reasons to be using the mechanical shutter on the Alpha 1, so I have consigned this to the Fn menu instead.
C4 Touch Operation Select
This is currently assigned to the default of Touch Operation (On/Off). Some Alpha photographers may not be a fan of using the Monitor for the purposes of Touch Focus, but it should be mentioned that Touch Tracking when using the Finder (using the Monitor as a Touch Pad) is a great way of initiating AF Tracking of a specific subject, even when you have the AF Area set to Wide.
Multi-Selector Center Button
This is, by default, assigned to Focus Standard. This is useful for centring a flexible spot when depressed or switching from Continuous Focus (AF-C) using a Wide focus area to Single Shot AF and a Center AF area.
Focus Hold and AEL Buttons
These two buttons are the easiest to depress while shooting with the camera at your eye. Your thumb is usually hovering over one or both of these buttons at all times. As AEL (Auto Exposure Lock) and Focus Hold are not useful in my own workflows, I have taken the opportunity to assign them to two Recall Custom Hold options, so I can quickly access a group of settings that can override eleven shooting settings (including the Exposure Mode, Drive Mode and Focus Mode settings that are controlled by hard dials). I will be highlighting why the Recall Custom Hold settings are so useful in a subsequent section of this Setup guide.
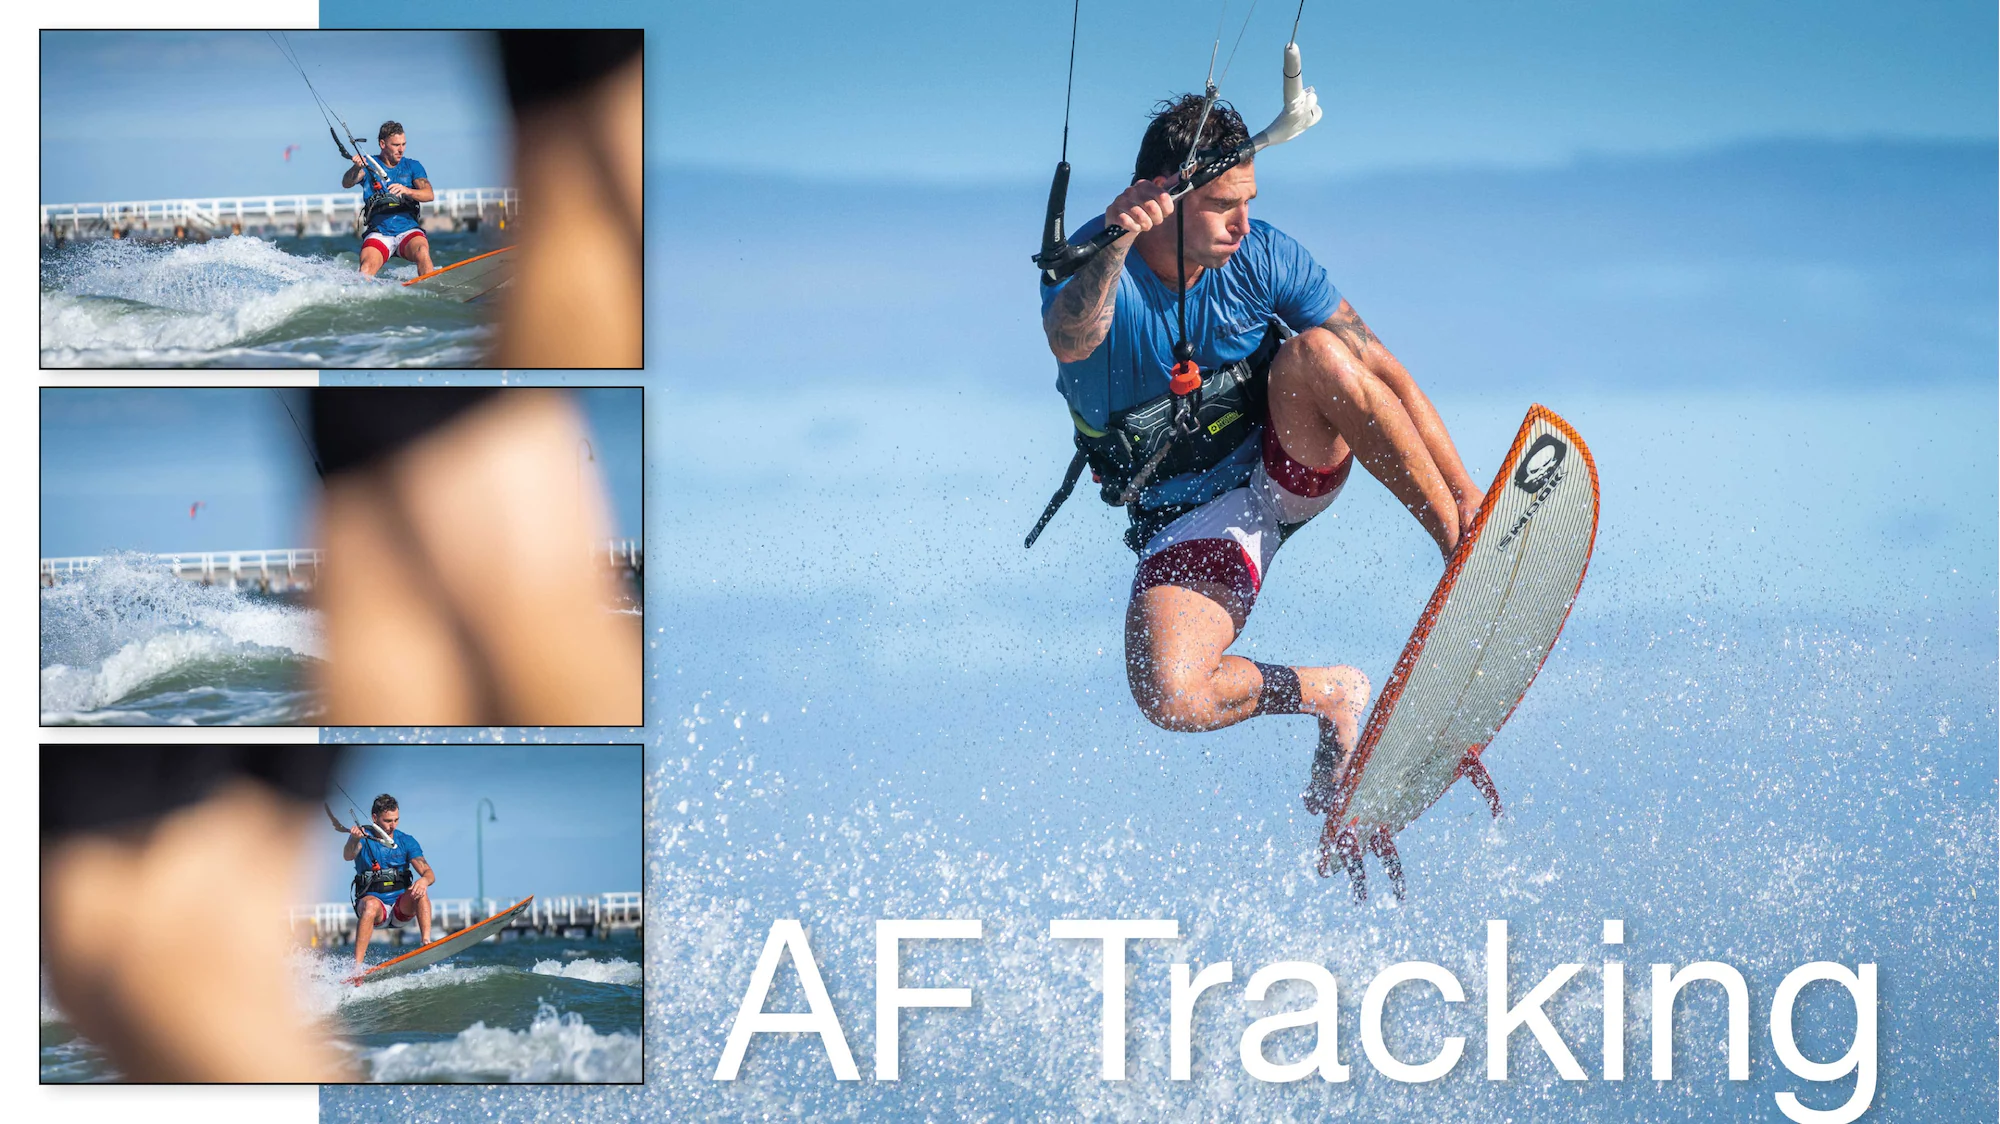
AF-On Button Tracking On + AF On (Focus P2)
The option for AF On combined with AF Tracking first appeared with the Alpha 7C camera and this has now become my favourite feature to be assigned to this button.
When my Focus area is set to Wide or Zone, I can start the tracking when the subject is front and centre in the finder and then choose when to start taking photos knowing that my focus is already tracking my subject – even when my subject is temporarily obscured by an obstacle that is closer to the camera. Alternatively, I can just use Touch tracking if the primary target is being obscured by obstacles most of the time.
Left Button
On all Alpha cameras, except the Alpha 9 and Alpha 9 II, the Left button is assigned to Drive Mode. As we have a Drive Mode dial on the top of the Alpha 1camera (for changing between Single Shooting, Continuous Shooting, Timer delay and Bracket modes) this leaves a free custom key waiting to be assigned a task. I have chosen White Balance for times when I am shooting JPEGs.
Note > The options for the Self-timer and Bracket settings on the Drive mode dial need to be assigned on Page 5 of the Shooting Menu.
Right Button
The default for this button is ISO and, as it is written on the camera body, my recommendation is to leave it as it is. You can raise or lower the upper limit of the ISO Auto Range, but I personally would not lower the upper limit from its default 12,800 setting. If anything, I would be tempted to raise it to 51,200.
Down Button
This is another unassigned custom button that is crying out for a purpose in life. I currently have mine assigned to ‘Display My Menu’, which is where you will store any remaining Menu items that cannot be assigned to either the Fn Menu or a Custom Key.
Custom Key Options
These are some of the options I may consider when capturing images in a Studio or out on location taking images of the stars (Astro Photography).
Live View Display Settings (Shooting P9)
To disable the Setting Effect when flash is your primary light source.
Aperture Preview Shooting (Shooting P8)
When Live View is Switched Off it is useful to be able to preview the depth of field at your chosen aperture.
Shot Result Preview (Shooting P8)
This is useful to be able to preview how much the ambient light is contributing to your shot when working with Flash as the primary light source.
Bright Monitoring (Shooting P8)
This is like have Night Vision for your camera. Great when you need to frame up your Astro landscape when you only have the light of the stars.
Focus Magnifier (Focus P4)
Great when you are using Manual Focus
Ext. Flash Firing Settings (Exposure/Color P4)
This will bring up your flash settings on your monitor, or in the Finder, when using a compatible Sony Flash (from the HVL-RM range).
Custom Key Options for Movies
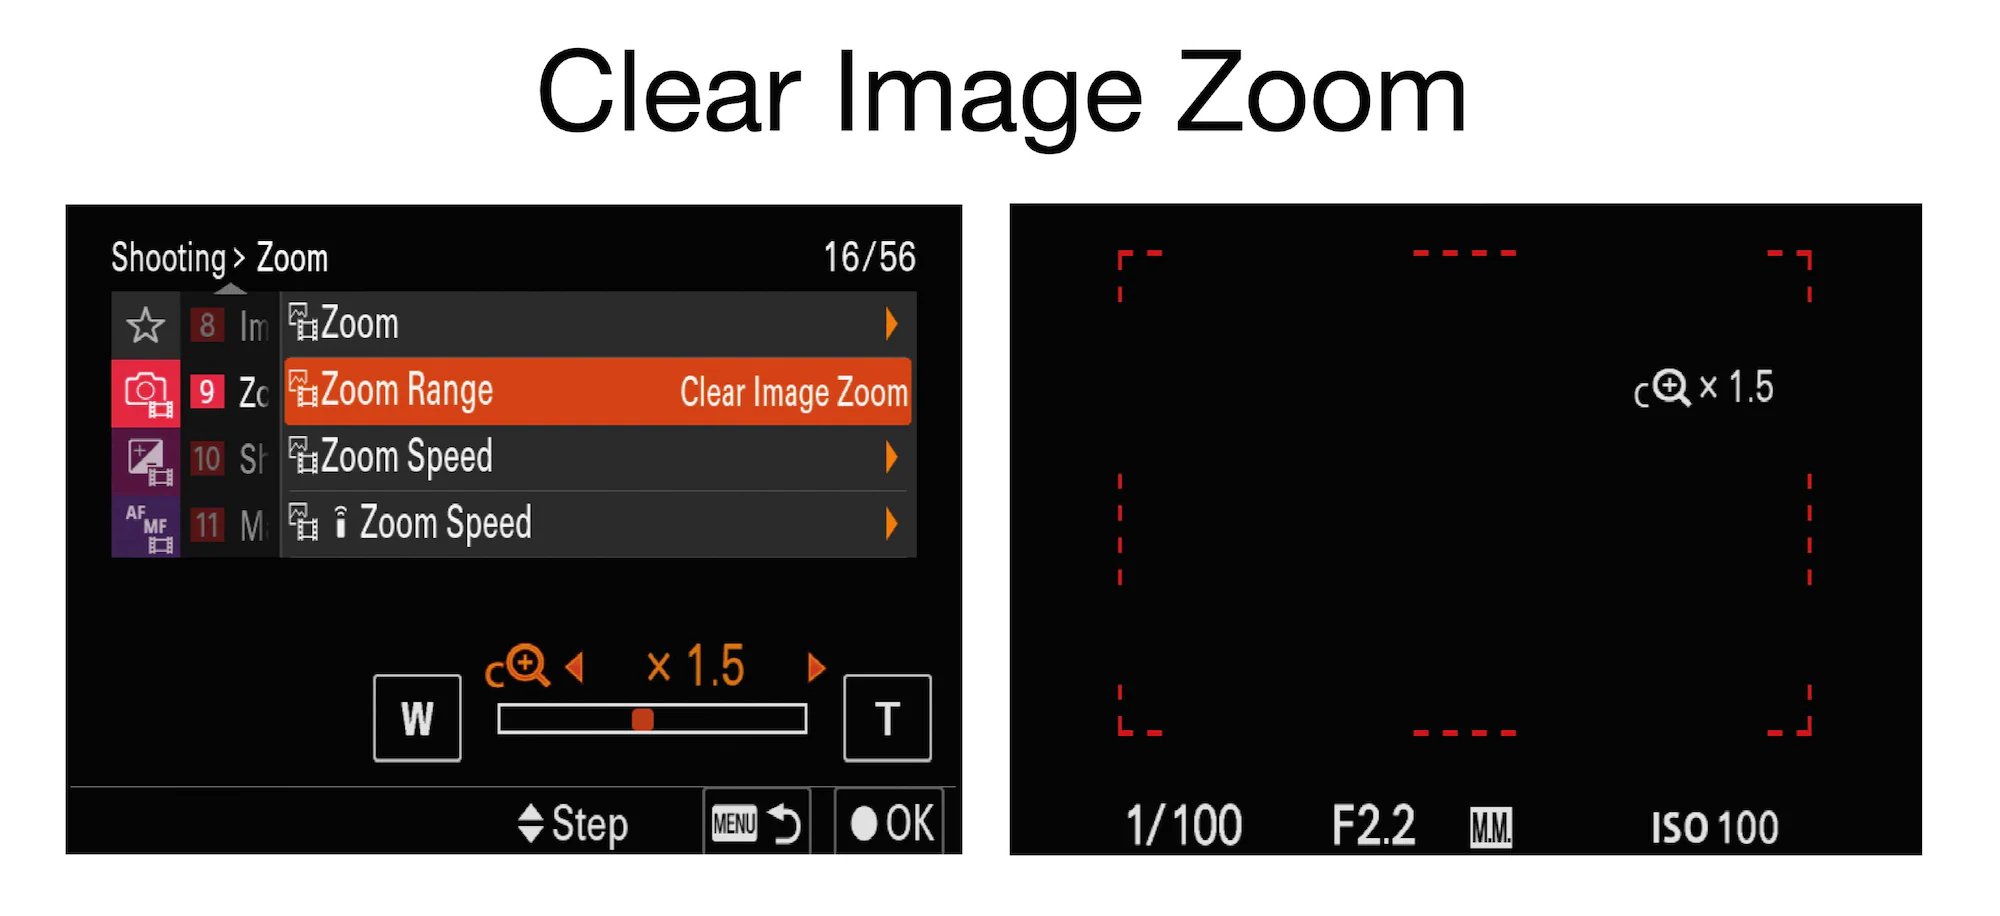
The only Custom Key I would like to draw your attention to when assigning options for capturing Movies is Clear Image Zoom (Zoom Range > Clear Image Zoom) from the Shooting menu (page 9). This feature can only be selected if the Shoot Mode dial is turned to Movies, or the file format is set to JPEG when shooting stills.
Clear Image Zoom allows you to zoom smoothly even when using a lens that is not equipped with a power-zoom. You can even zoom when using prime lenses with little or no loss in recording quality. You are effectively zooming in from your 8K sensor to the 4K area on your sensor.
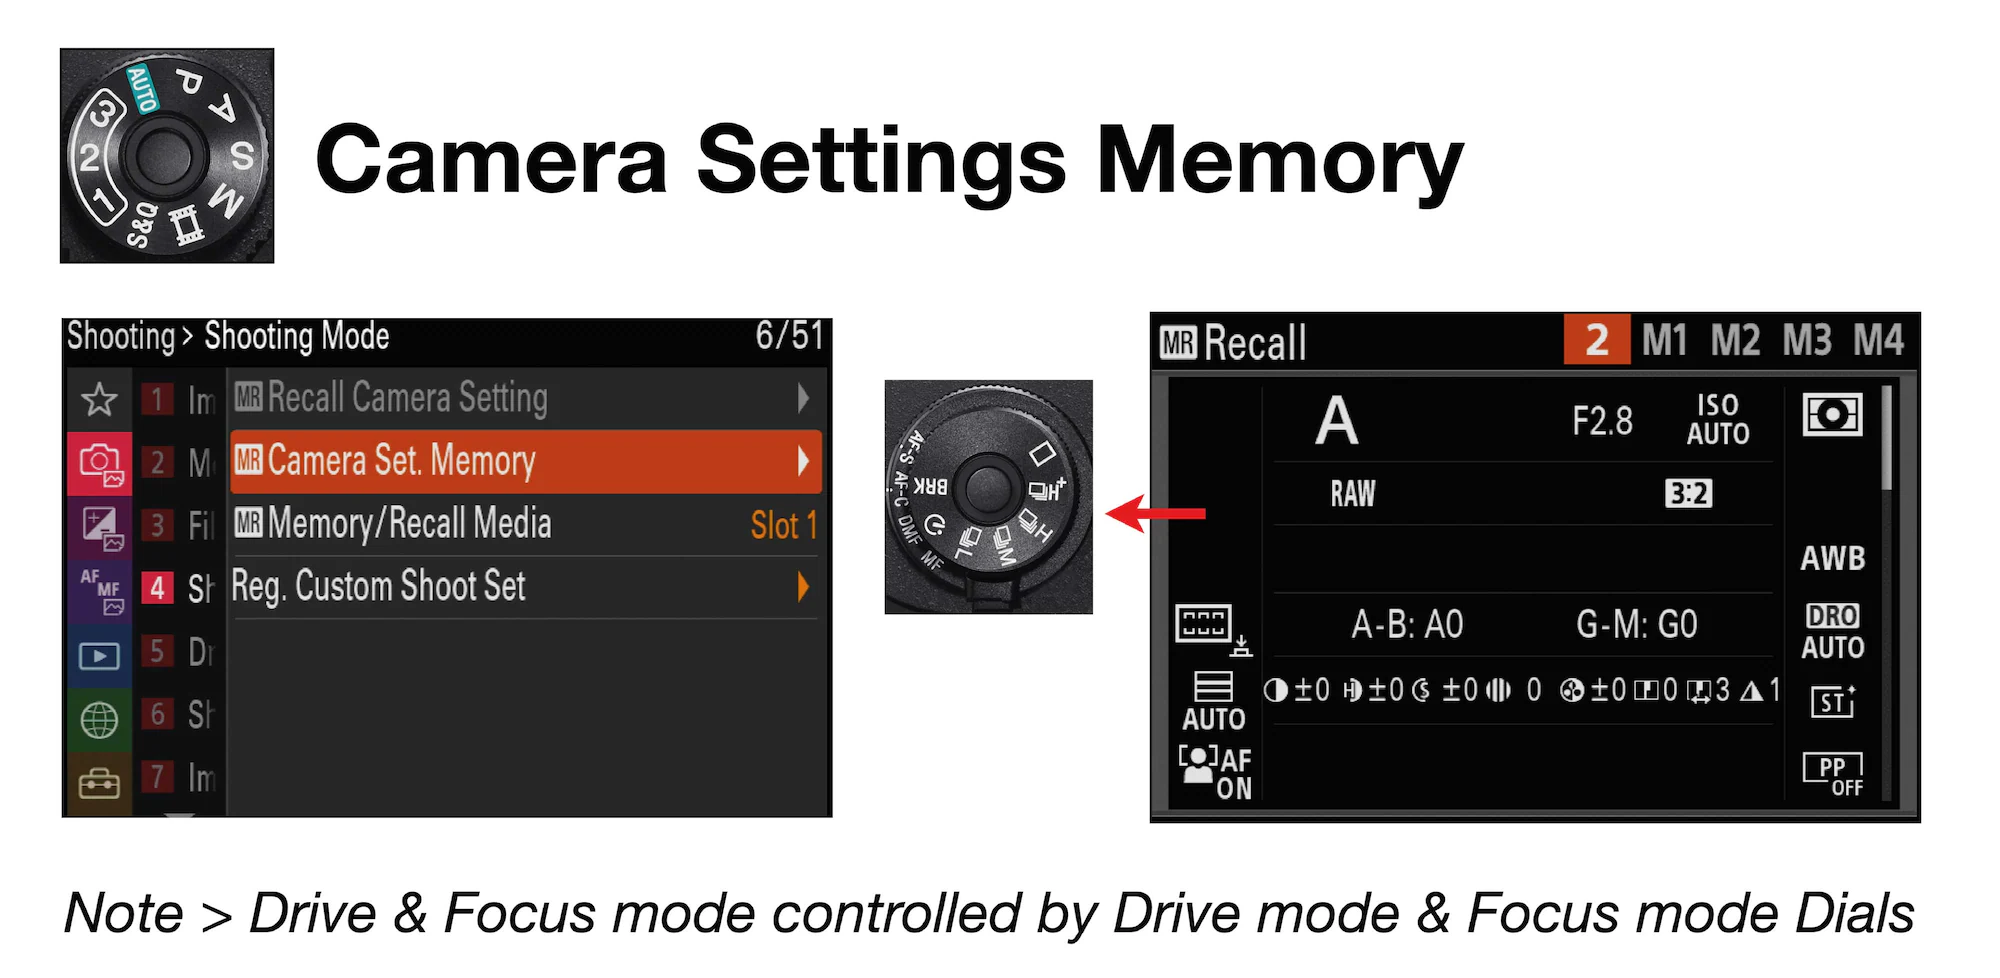
Camera Settings Memory
It is possible to register three groups of camera settings that are stored in the camera’s on-board memory and a further four more to a memory card.
These can be recalled by simply turning the Shoot Mode dial to 1, 2 or 3. In this manner you can quickly reconfigure the camera completely with camera settings optimised for shooting very different subjects, e.g., landscapes and sports/action. I personally find this feature invaluable, and it defines my own personal workflow. I shoot 95% of my stills starting with the Shoot Mode Dial turned to 1, 2 or 3, safe in the knowledge that I will not have overlooked a setting that may lead to a missed shot.
If you have owned a previous Alpha camera (one that was not the Alpha 9 or Alpha 9 II) you will need to be aware that Drive Mode and Focus mode cannot be assigned to the memory, as the memory cannot override the physical Drive Mode and Focus Mode dials on the top of the camera (dials that are not present on the Alpha 7 range of cameras).
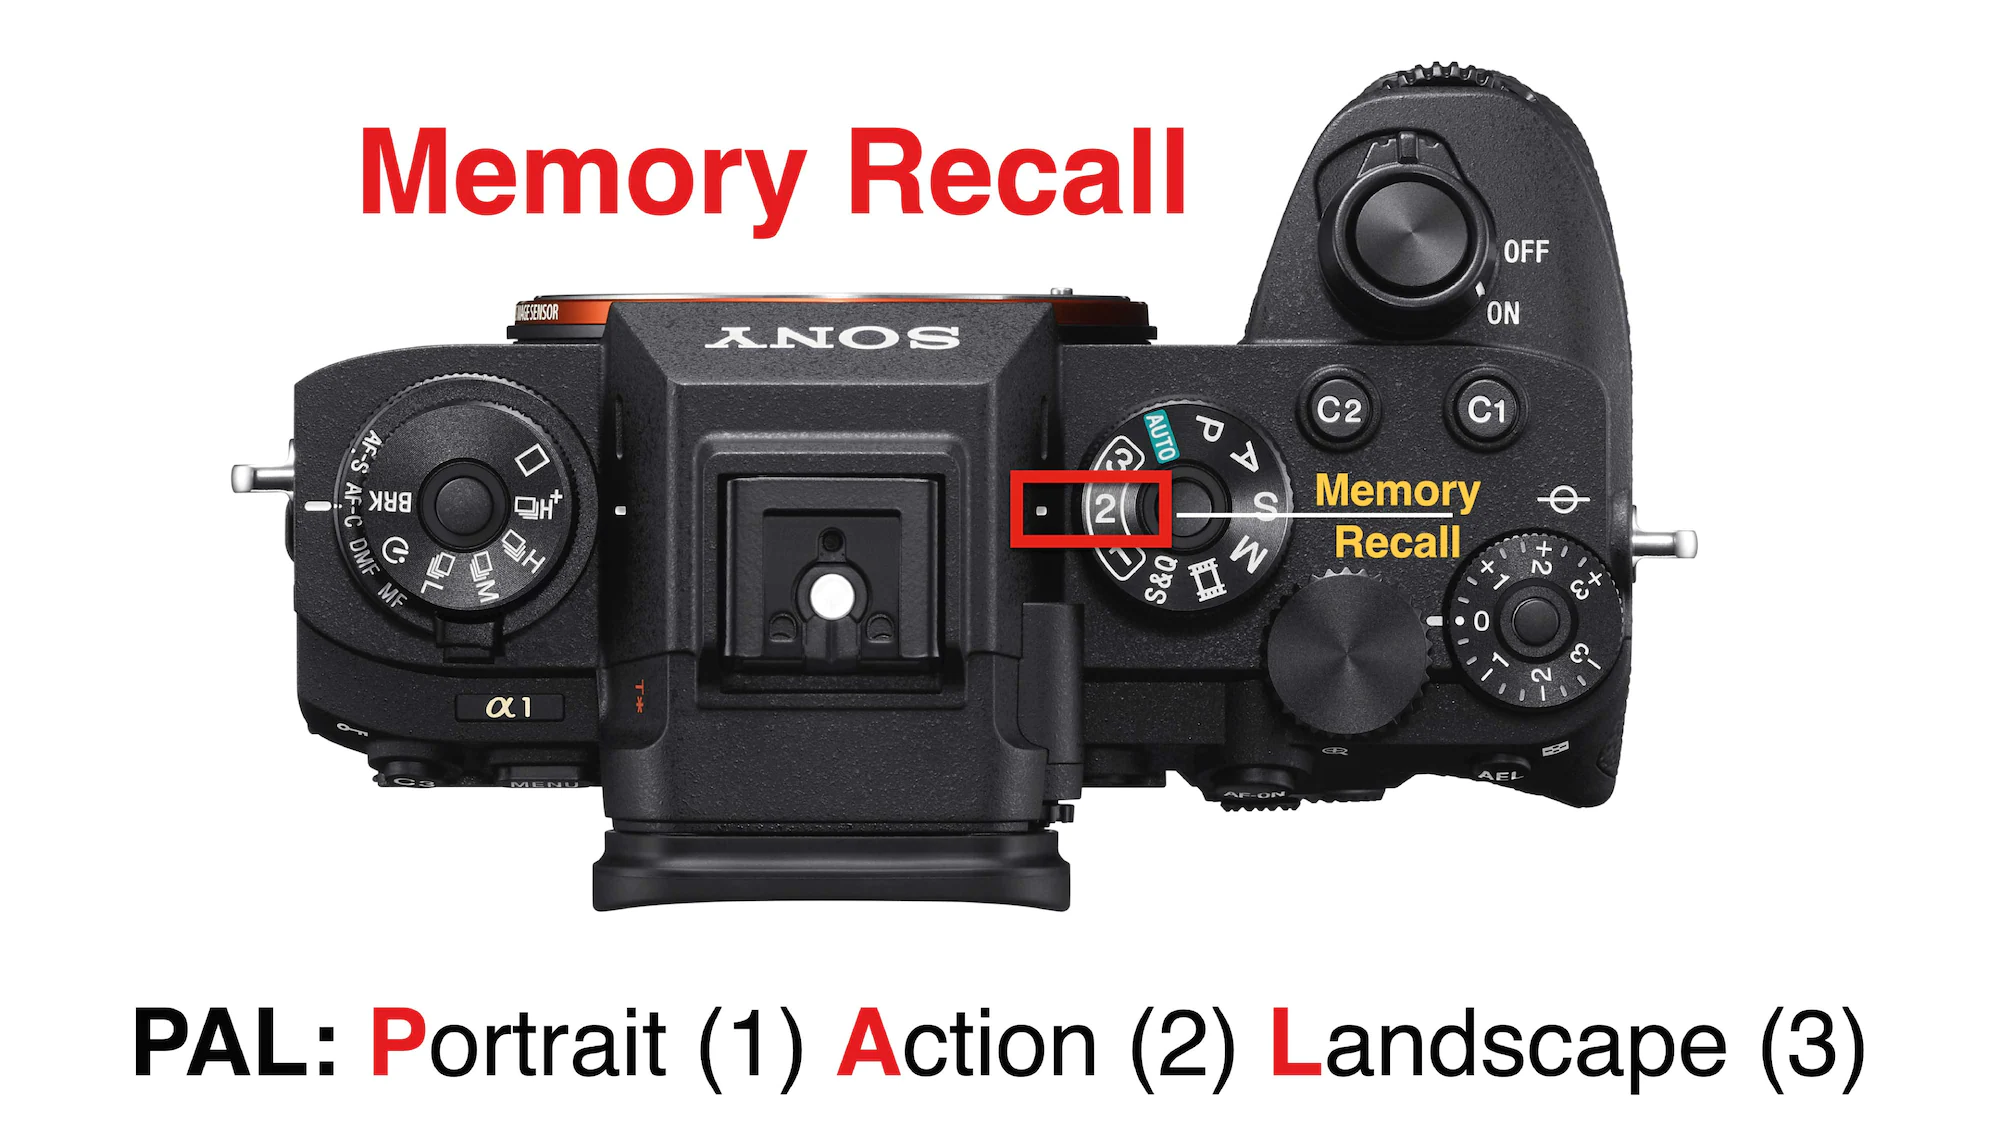
For my own workflow I use the acronym PAL (Portrait, Action and Landscape), so that I can easily remember what I have assigned to the 1, 2 and 3 Memory Recall options on the Shoot Mode dial. Portrait prioritises shallow depth of field, Action prioritises fast shutter speeds and Landscape prioritises depth of field and low ISO for static subjects.
These Memory settings act as starting points for what I am shooting, and settings can be fine-tuned or modified according to the specific subject I am shooting, e.g., stopping down to a smaller aperture when using the number 1 Recall when shooting a group portrait instead of a single figure. If the Shoot Mode dial is turned away from your memory setting and then back again, the default settings you have registered are restored. If you need to modify the default settings, or replace the registered setting, you must go into the Main Menus and register a new group of settings over the currently registered setting.
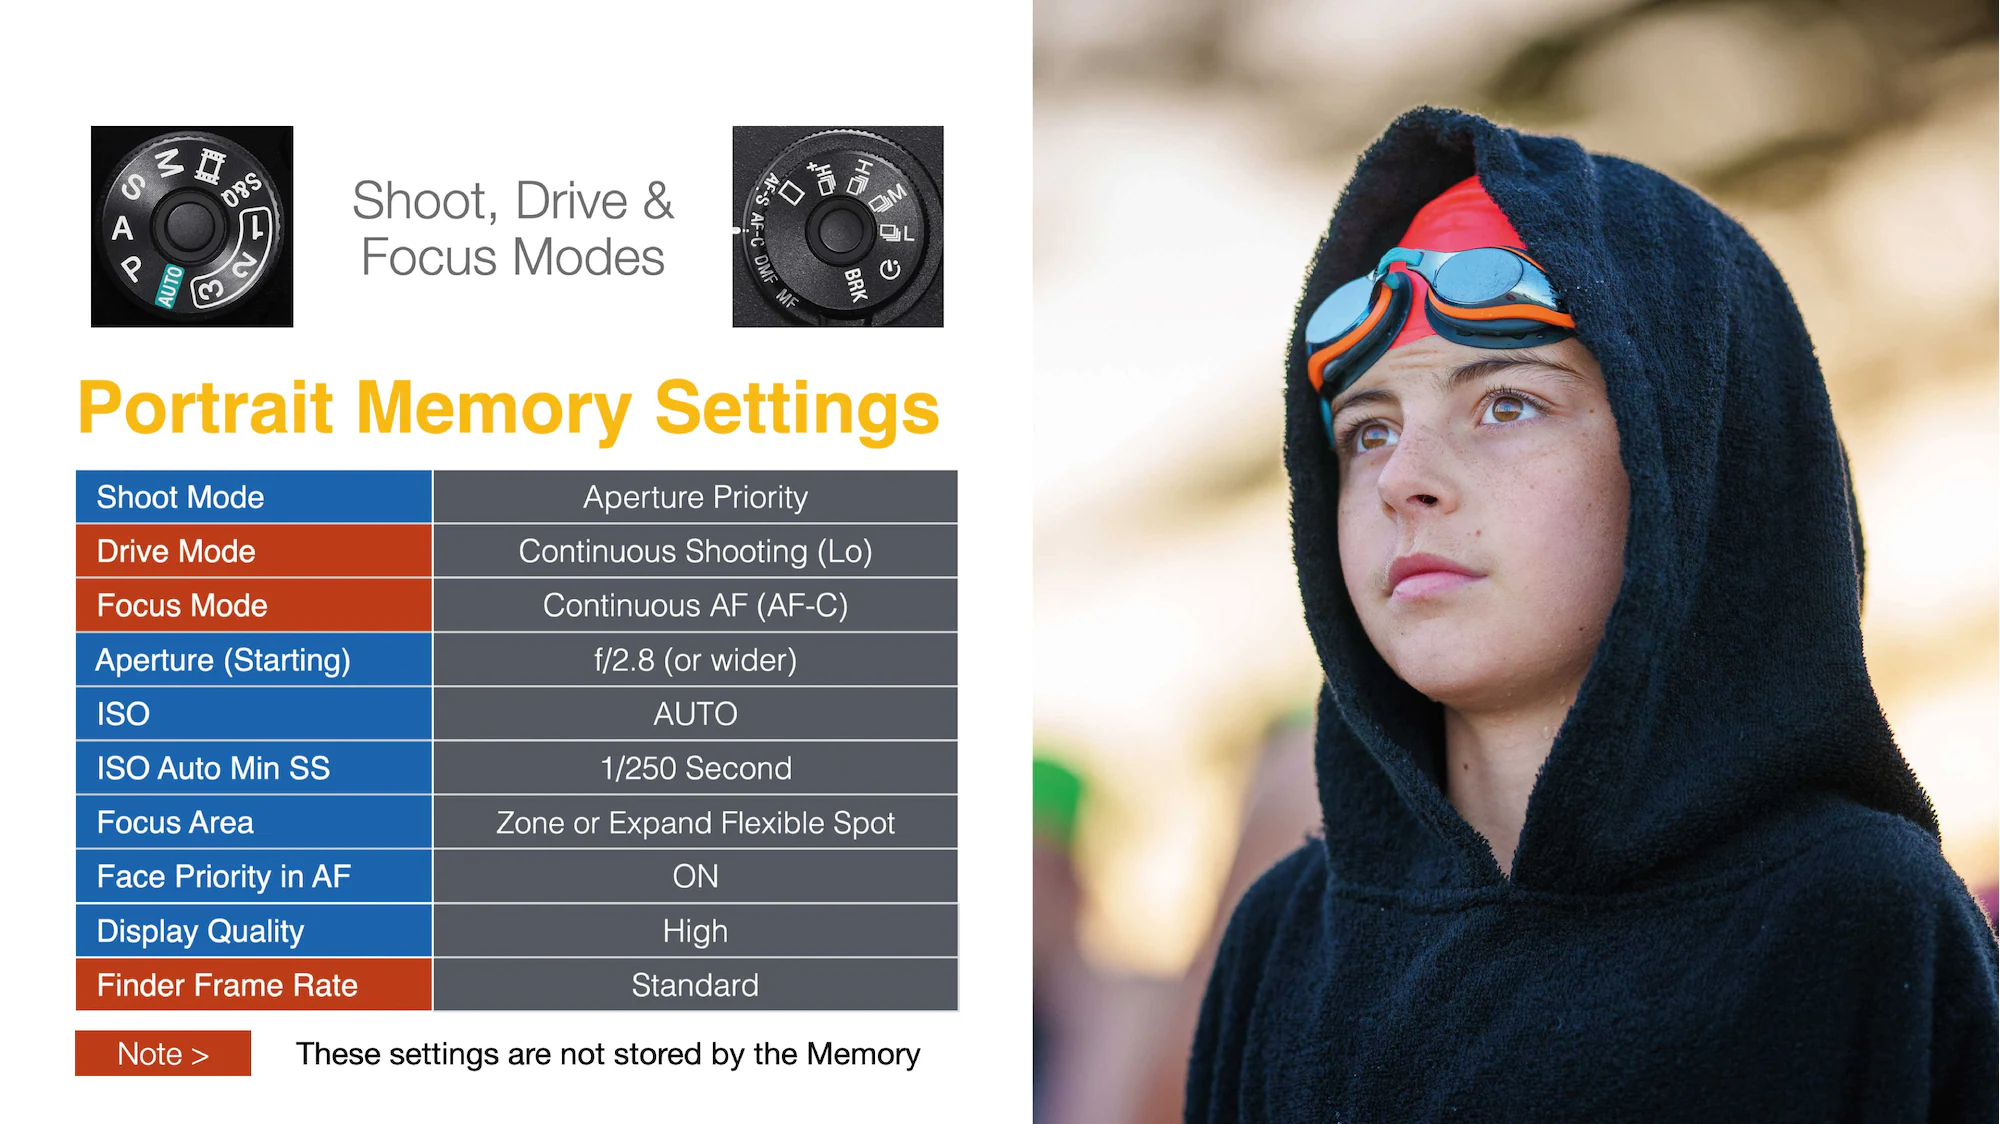
Portrait Memory Setting
To register a ‘Camera Set. Memory’ you will need to first set up the camera with all of the settings you would later like to recall, and then go to the Shooting Memory (P4) > ‘Camera Set. Memory’ and choose a Recall number to register the setting against. 1, 2 & 3 are stored on the camera and M1-M4 are stored on the memory Card.
Note > The Memories stored on the Memory Card are deleted when the card is formatted, so you may want to back these settings up on your computer, or use a memory card that you do not intend to format (used only to load settings)
I have listed most of my Portrait settings on the table, in the illustration above. The first three settings (Shoot, Drive and Focus Modes) are set using the Dials on the top of the camera. Your preferred starting Aperture can only be recalled by the Shoot Mode dial if a lens that has an Aperture ring is set to A (Auto).
If you have set up the Custom keys, you can set the ISO Auto Min SS by pressing the C1 key. I typically find that 1/250 second is fast enough to freeze slow moving subjects. When recalling this memory via the Shoot Mode dial you will also need to check the Drive Mode and Focus Mode dials are set for the task in hand and optimise the Finder Frame Rate via the Fn menu (the ‘Standard’ setting providing the optimum resolution for the Finder).
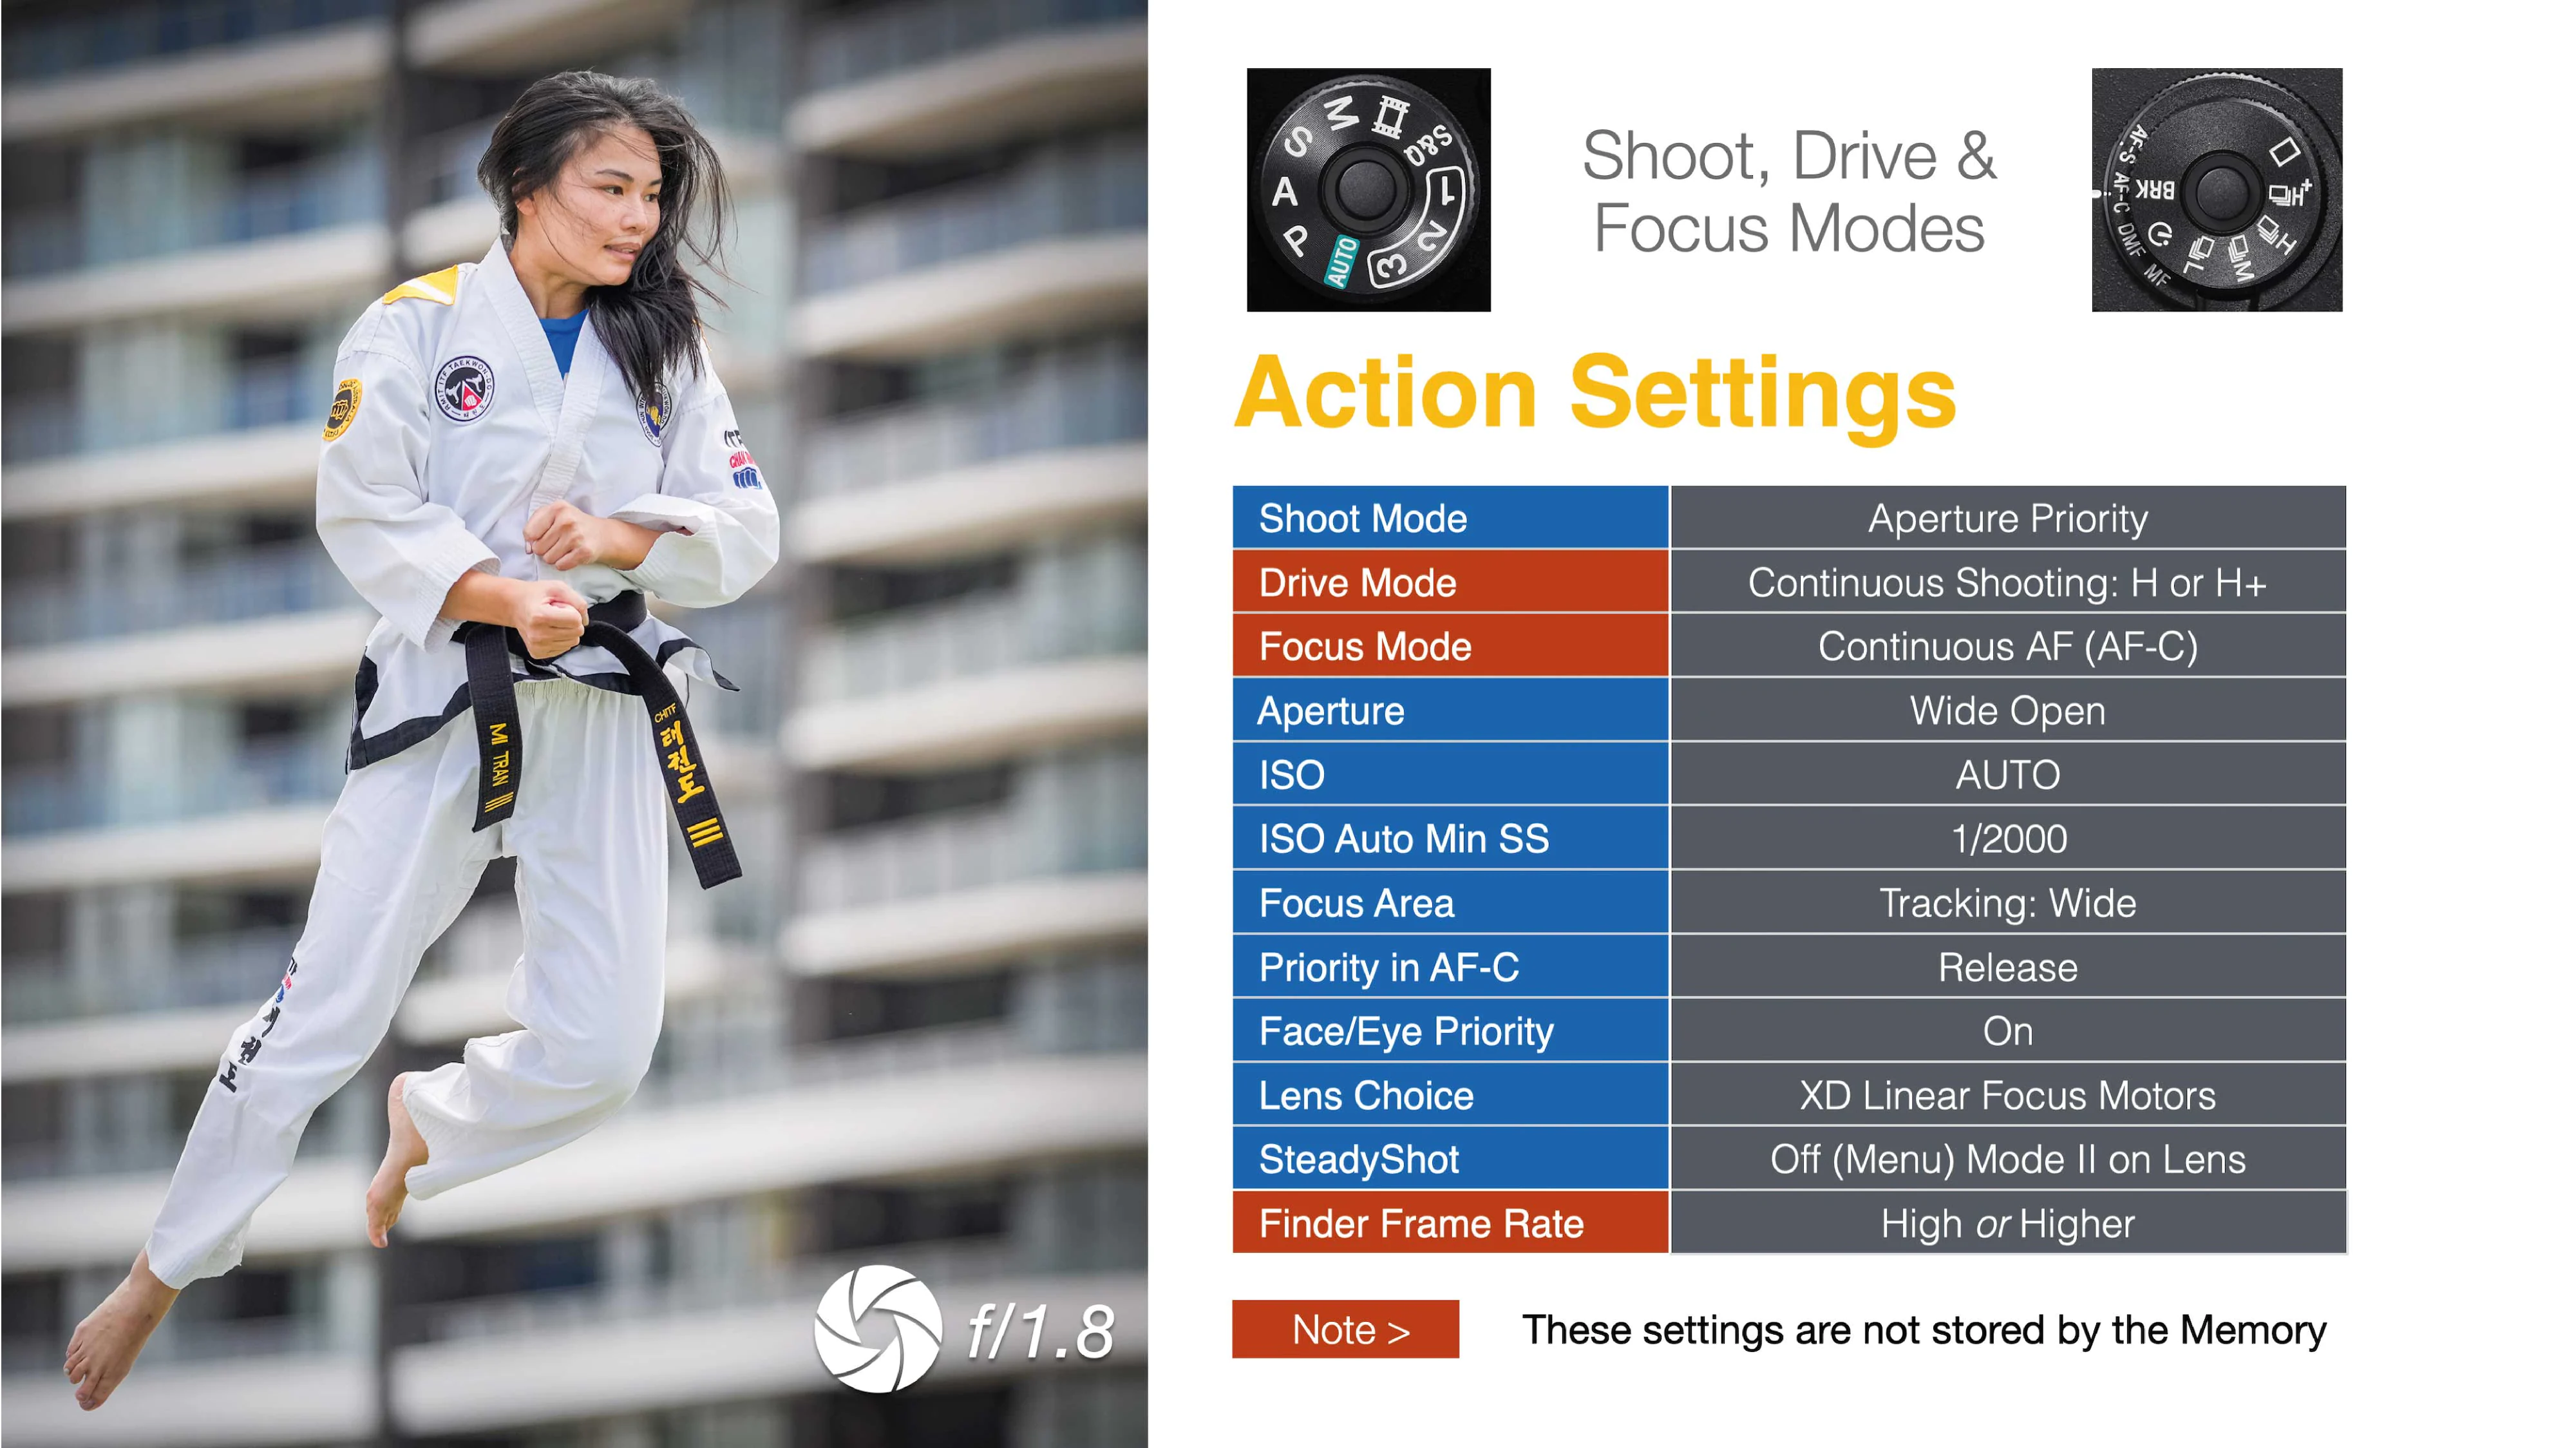
Action Memory Setting
For the Action memory I have changed the ISO Auto Min. SS to 1/2000 second. In low ambient light this fast shutter speed may not be achieved once the ISO has reached the upper limit in the ISO Auto range (12,800 by default). In this event the shutter speed will be slower in order to protect exposure.
When setting up this Action memory in a studio setting you will be unlikely to see the camera being able to achieve this fast minimum shutter speed due to the low levels of light in the testing environment. SteadyShot can be switched to Off in the men but will revert to On if the SteadyShot switch on the lens is set to On. SteadyShot Mode II is the preferred setting on the lens when panning.
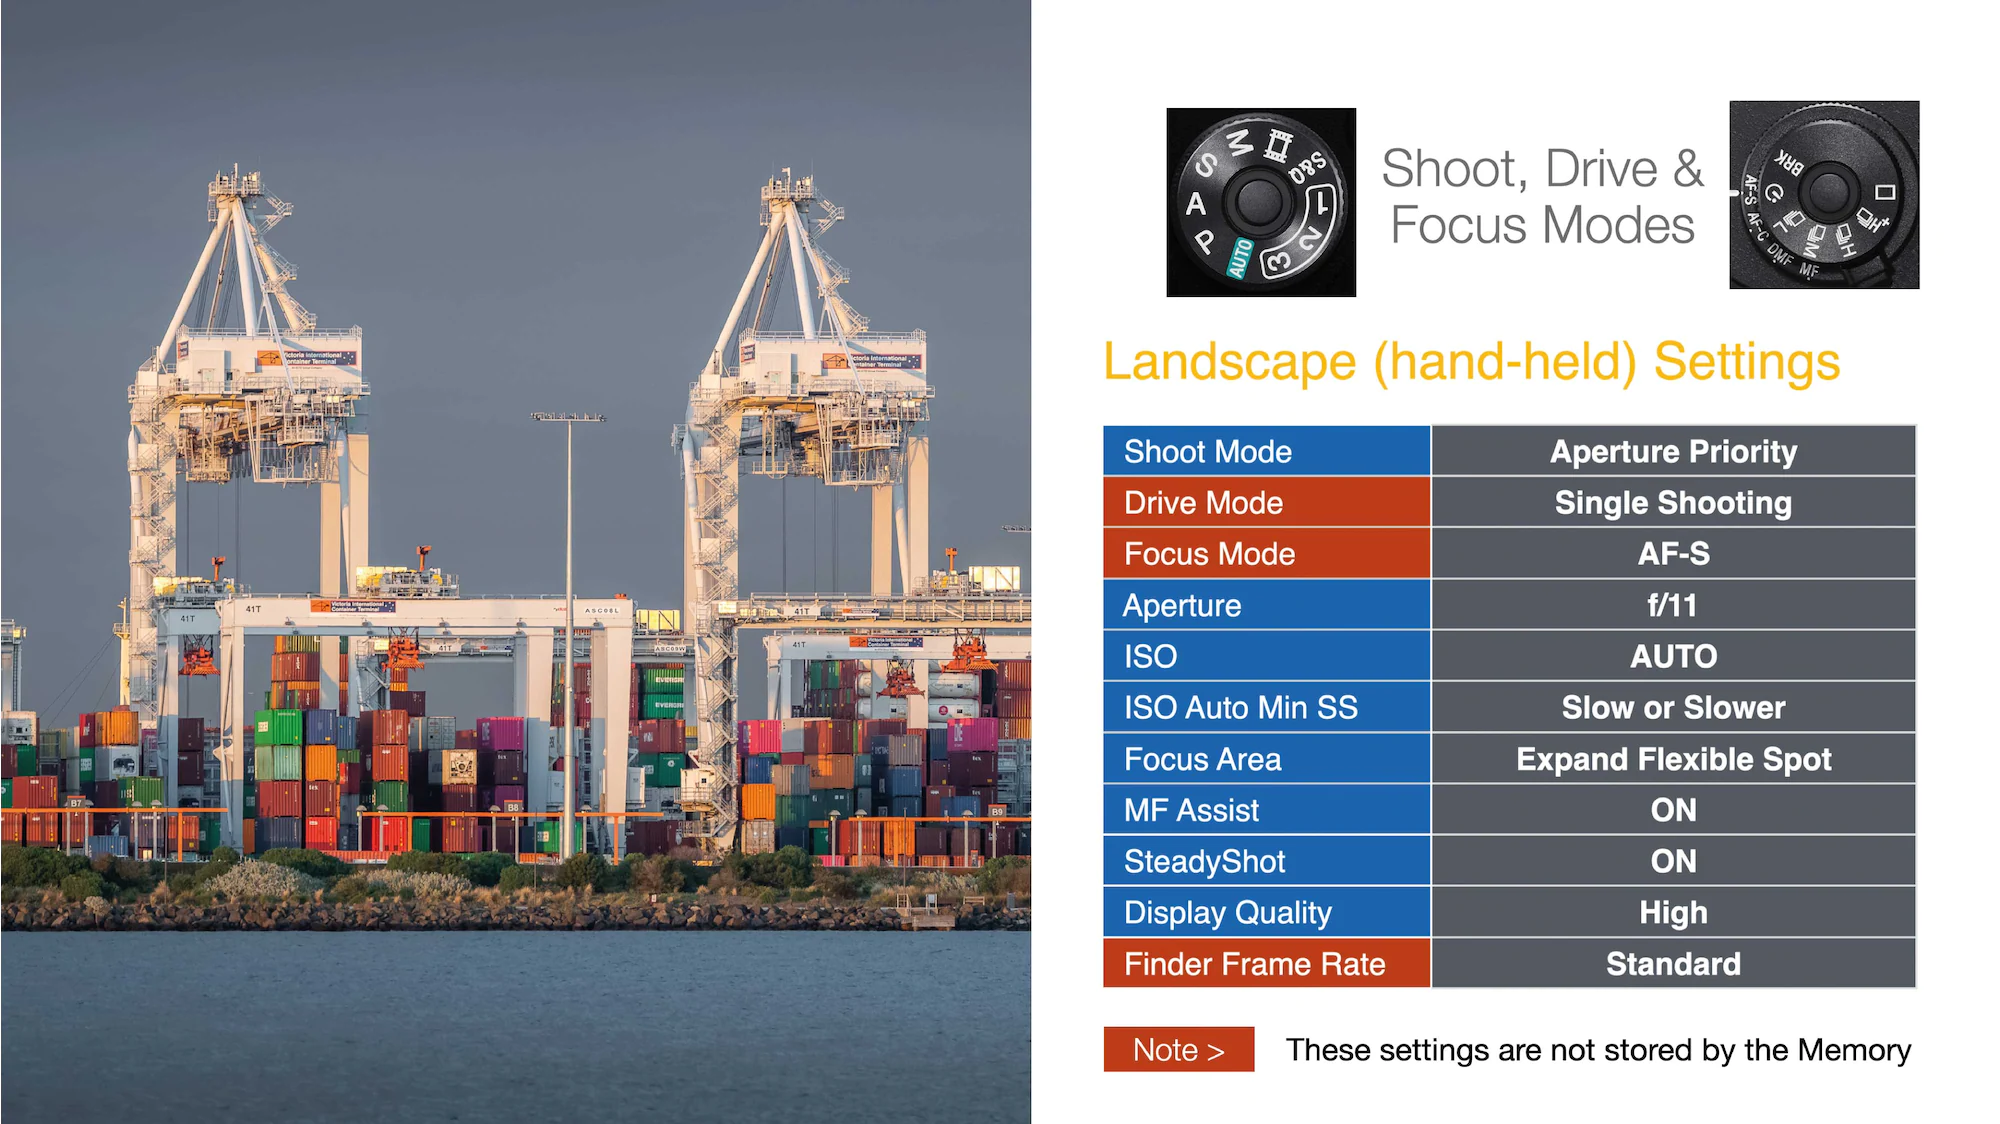
Landscape Memory Setting
In this group of settings, you will notice the Aperture has been stopped down to F11 and the ‘Slower’ option selected from the ISO Auto Min. SS menu. These settings are optimised for hand-held shooting where depth of field and low ISO are the priority.
If there is no immediate foreground in my scene I may open up to f/8 or wider. If the camera is mounted on a tripod the ISO can be set to 100 and I will use either the Self-timer, or Sony’s Bluetooth remote, to release the shutter if the shutter speed is very slow. I will also consider switching to Manual Focus when using a Hyper-focal Distance setting to achieve maximum depth of field.
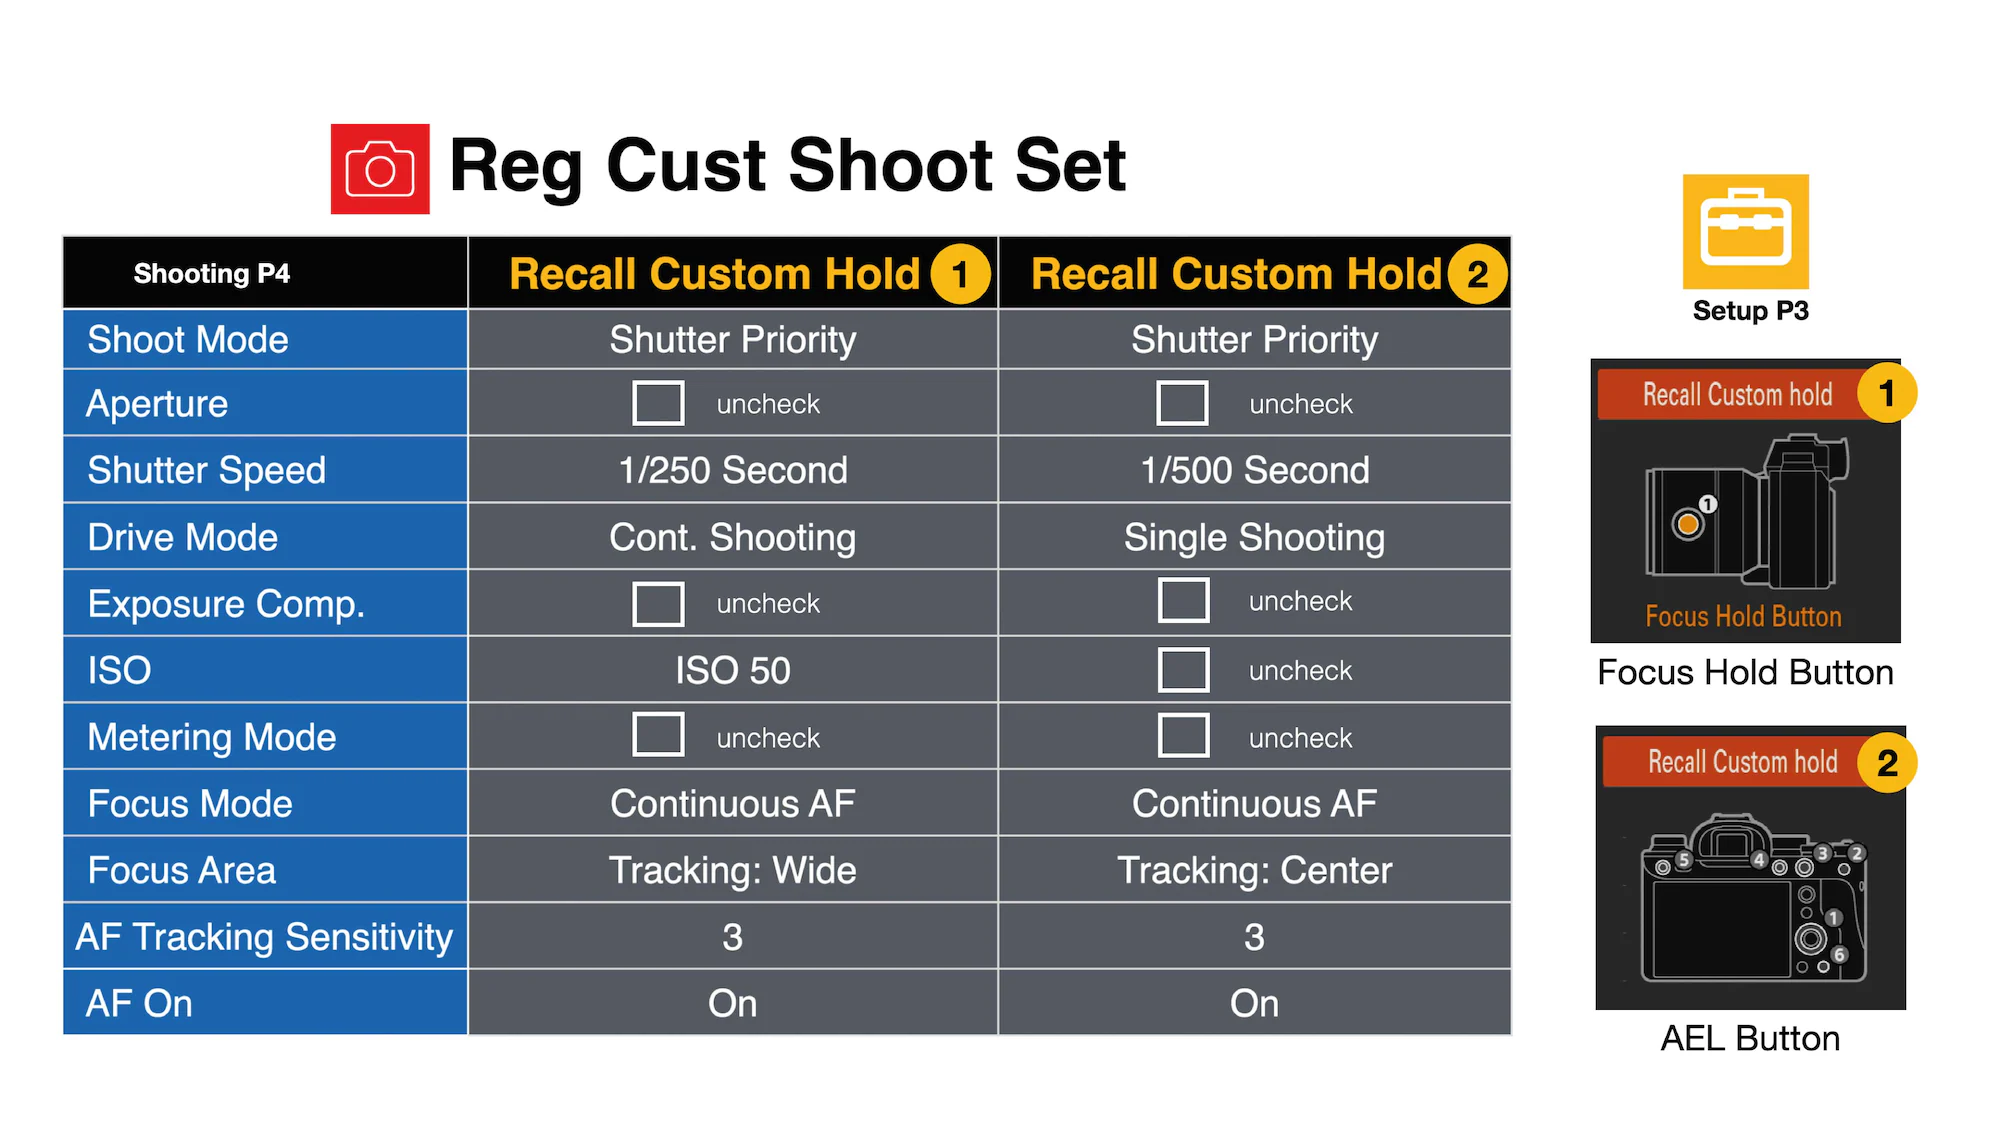
Reg. Custom Shoot Set
In the section where we assigned operations to the Custom Keys, I outlined the importance of the Recall Custom Hold memories. Unlike the Memories that can be recalled via the Shoot Mode Dial the ones recalled by holding down a Custom key can override settings on the Shoot Mode, Drive Mode and Focus Mode dials.
This makes these registered settings invaluable when a photographer quickly needs to override shooting settings, when the current settings are no longer appropriate for the task in hand. As well as registering settings via the Reg. Cust Shoot Set menu (Shooting > Shooting Mode P4), Custom Keys need to be assigned to recall these registered settings (Setup > Operation Customi
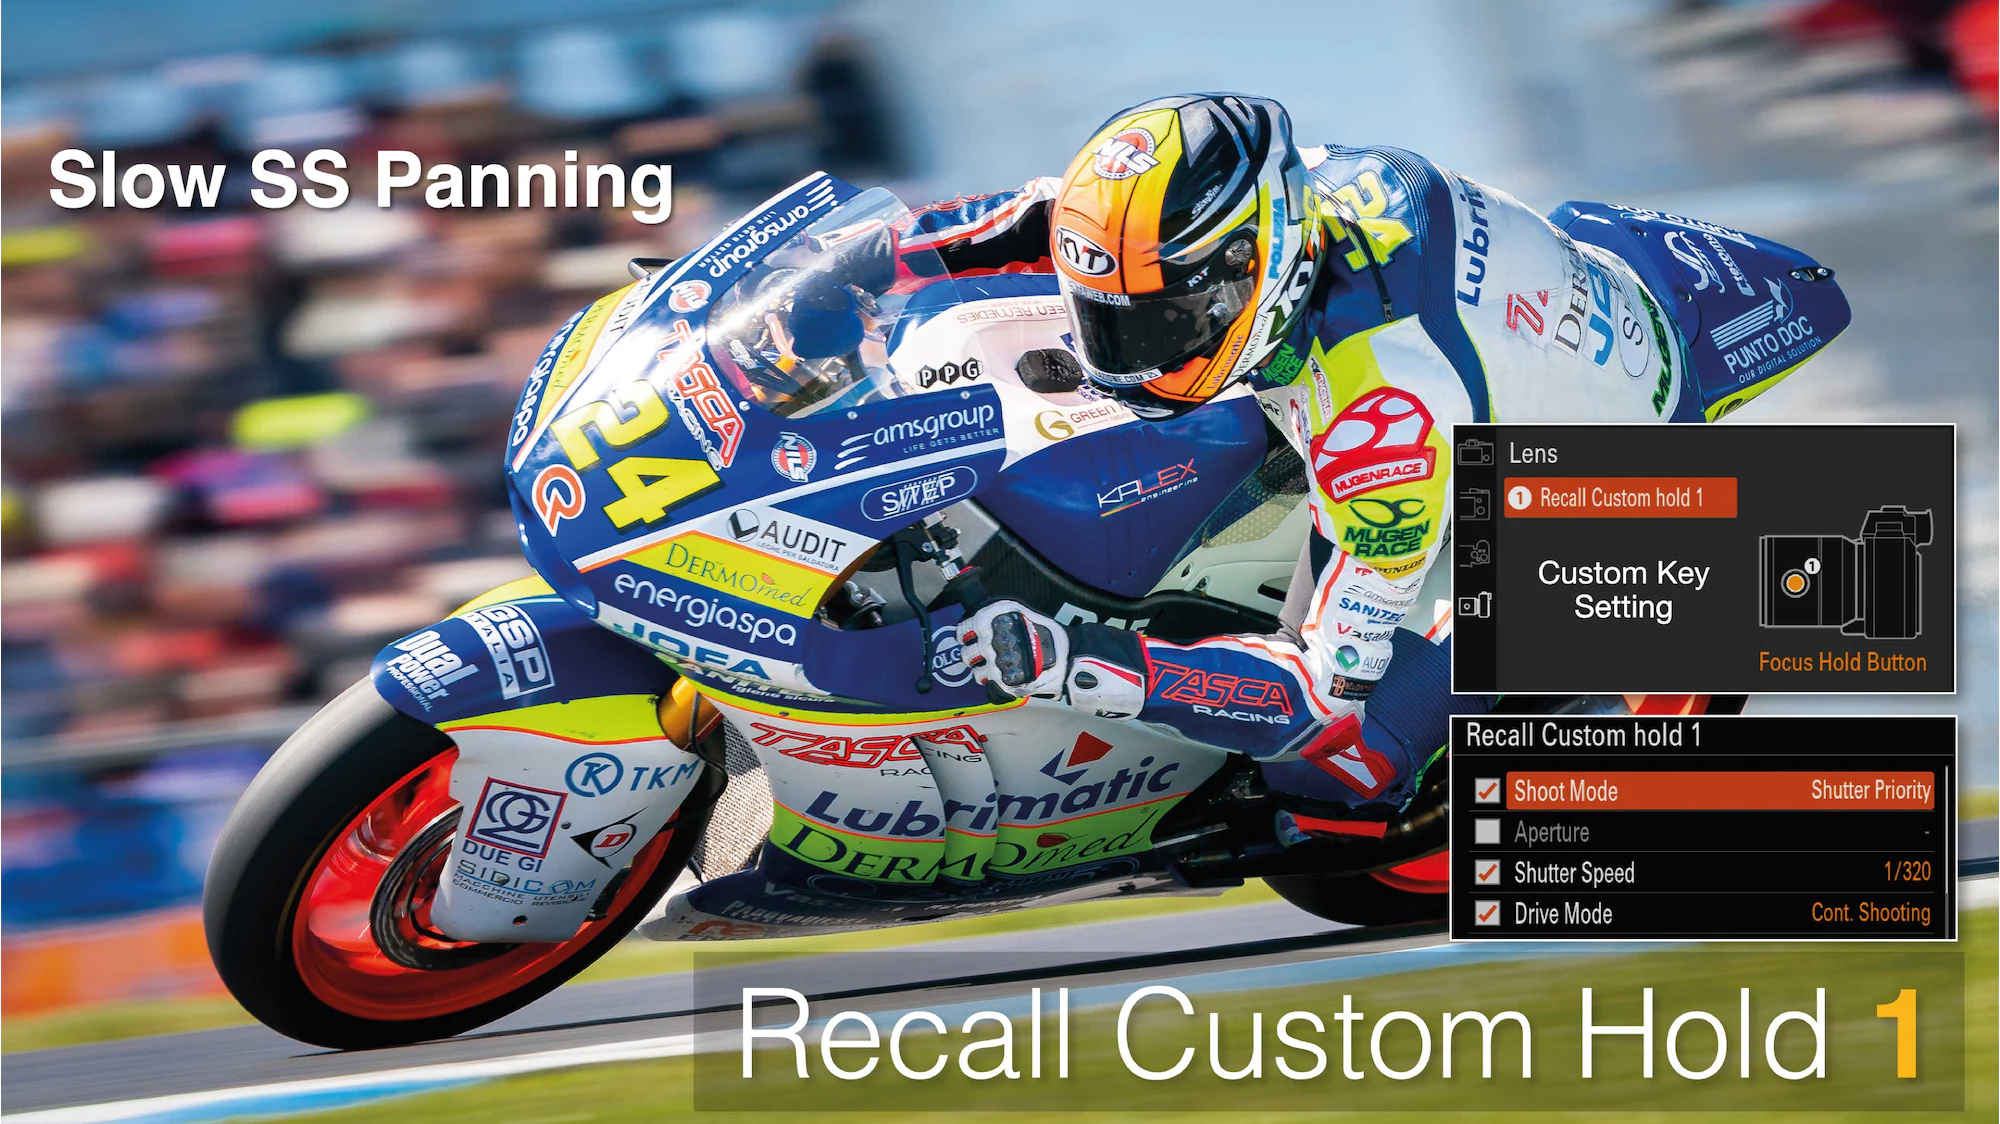
Recall Custom Hold 1
I use the Recall Custom Hold 1 by pressing the focus hold button on the lens, for times where I am panning the camera and require a slower shutter speed to create some movement blur behind my subject. If your panning technique is excellent and/or your subject is not moving rapidly you may choose a shutter speed of 1/60 or 1/125 second. For very fast motorsports you may need to increase the shutter to 1/320 or 1/500 second to increase the percentage of sharp shots.
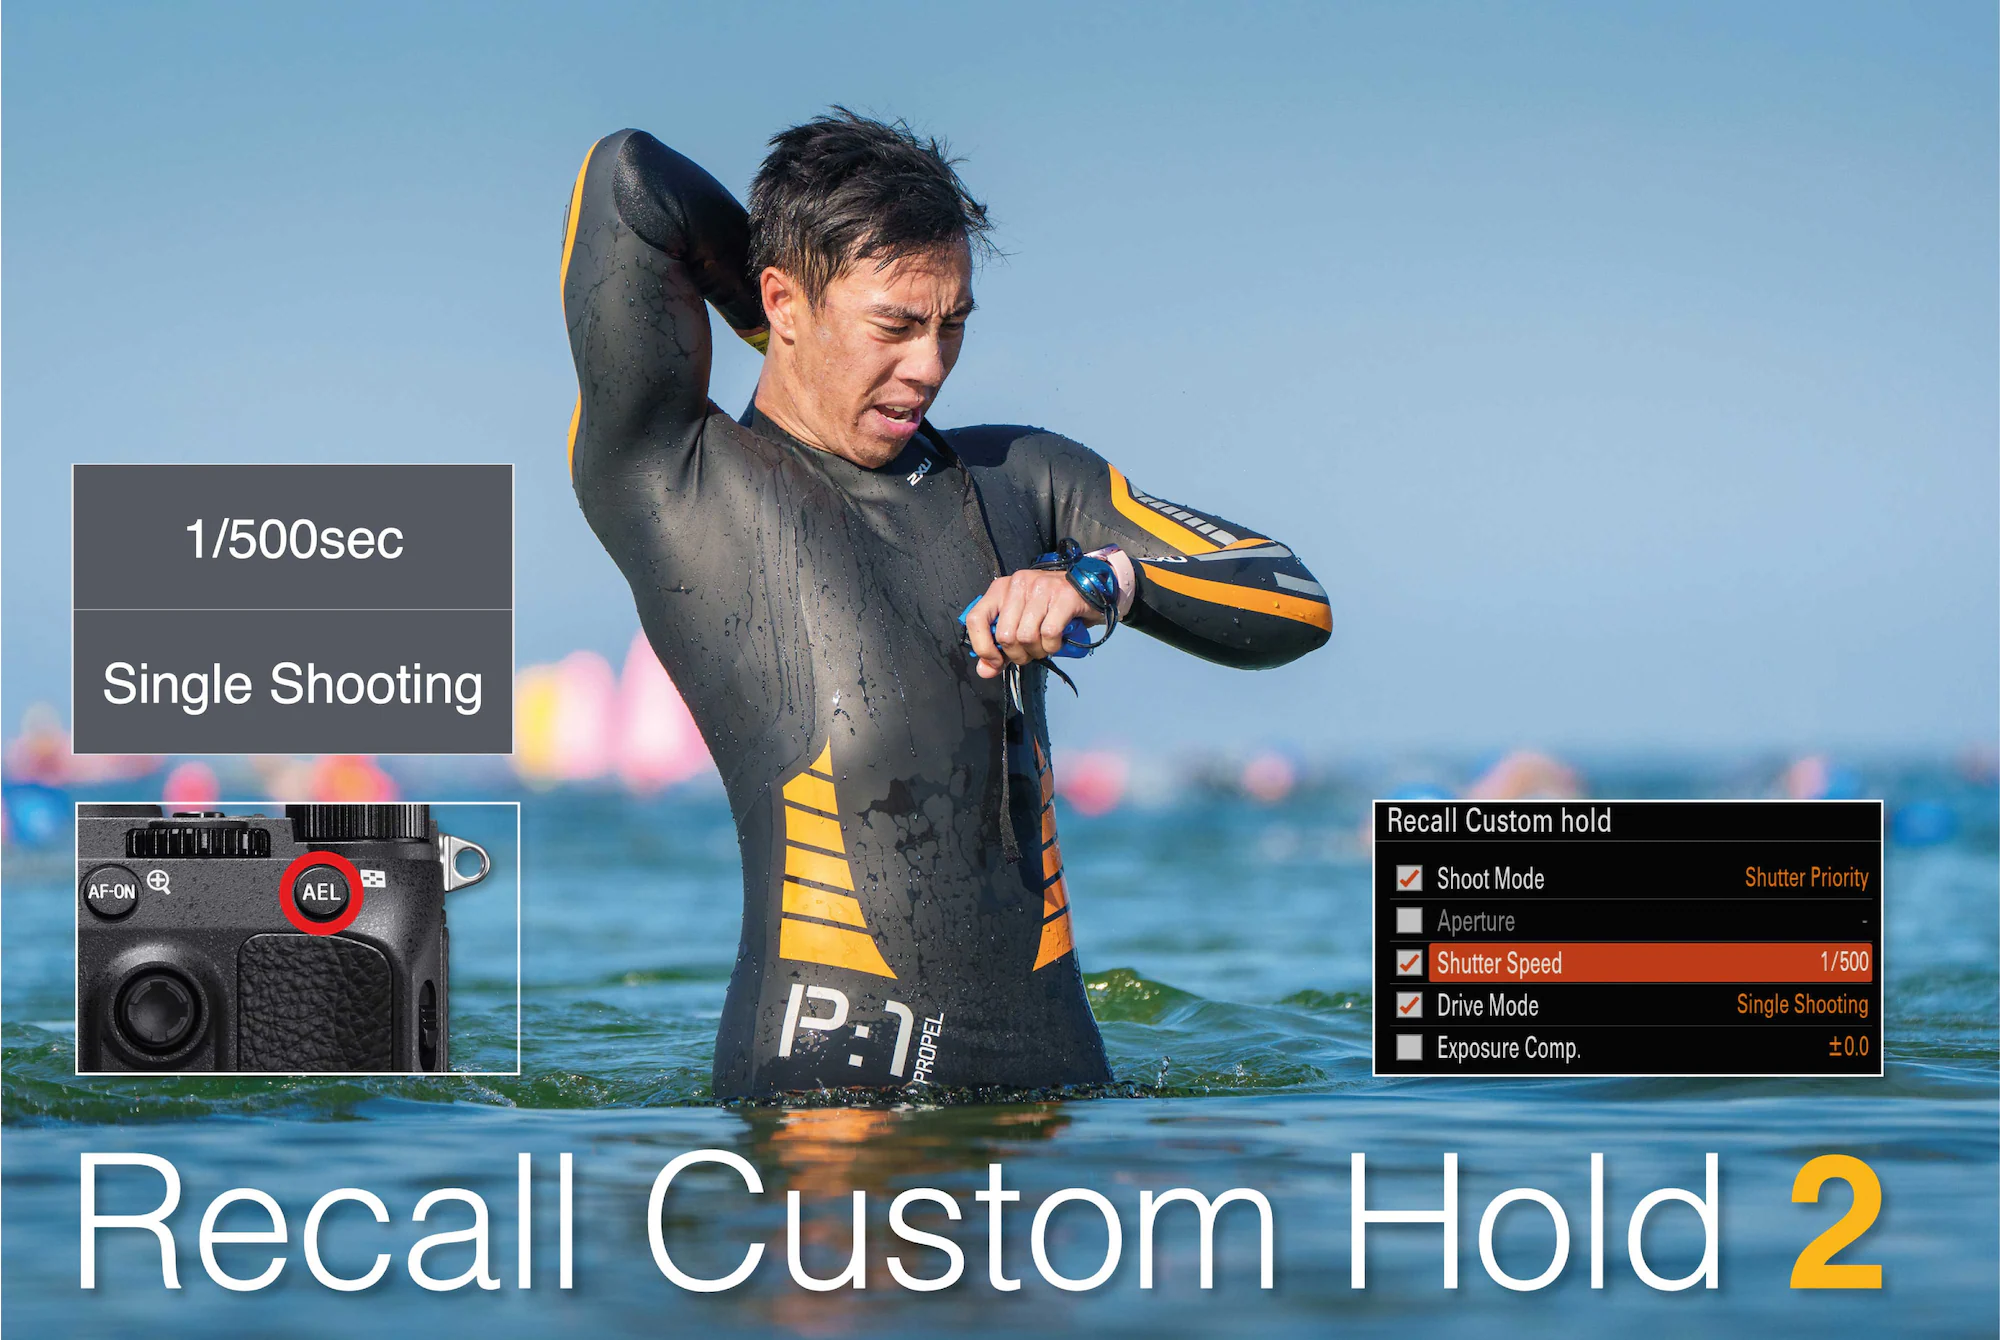
Recall Custom Hold 2
I use my Recall Custom Hold 2 settings by pressing the AEL button when the fast action has not yet started, or the fast action has momentarily come to a halt, e.g., a bird that is preparing to take to the wing or a runner who has come to a sudden stop. This enables me to take just a single image when I press the shutter release with a slower shutter speed, instead of taking multiple images at a faster shutter speed (and higher ISO).
Movie Settings
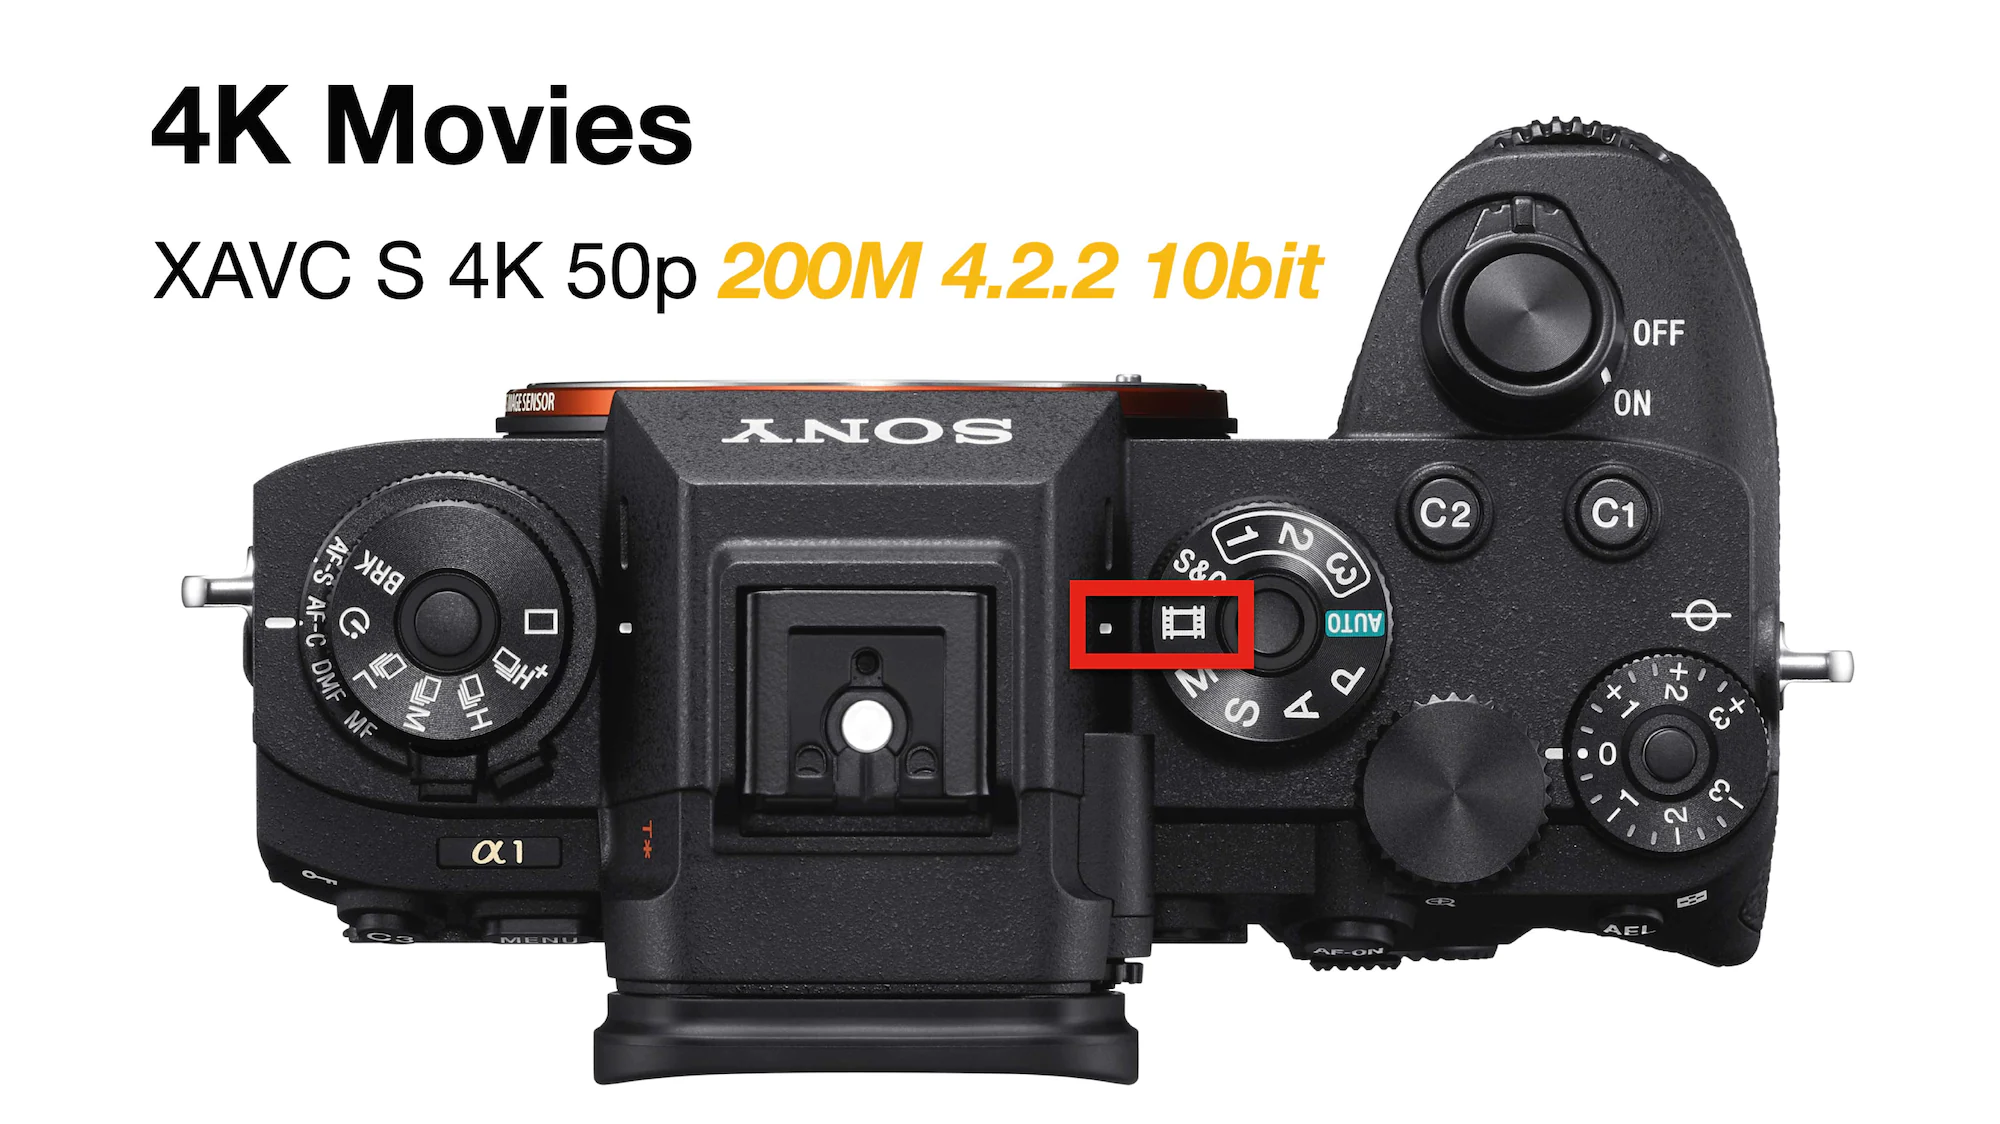
The Choice of Settings when shooting 8K is not complicated as there is no choice of file Format or Frames Per Second. If you want to choose the highest quality ‘Record Setting’ from the Shooting > Image Quality > Movie Settings menu (P1), choose 400M as your compression setting (400M 4.2.0 10bit instead of 200M 4.2.0 10bit). If you want to record for extended periods of time (longer than 10 minutes per clip, it is recommended to tilt the Monitor away from the camera body and shield the camera from full sun.
The settings I recommend for shooting High Quality 4K movies, that are relatively fast to edit, are XAVC S 4K 200M 4.2.2 10bit when shooting 50 or 60 frames per second and 140M 4.2.2 10bit when shooting 24, 25 or 30 frames per second.
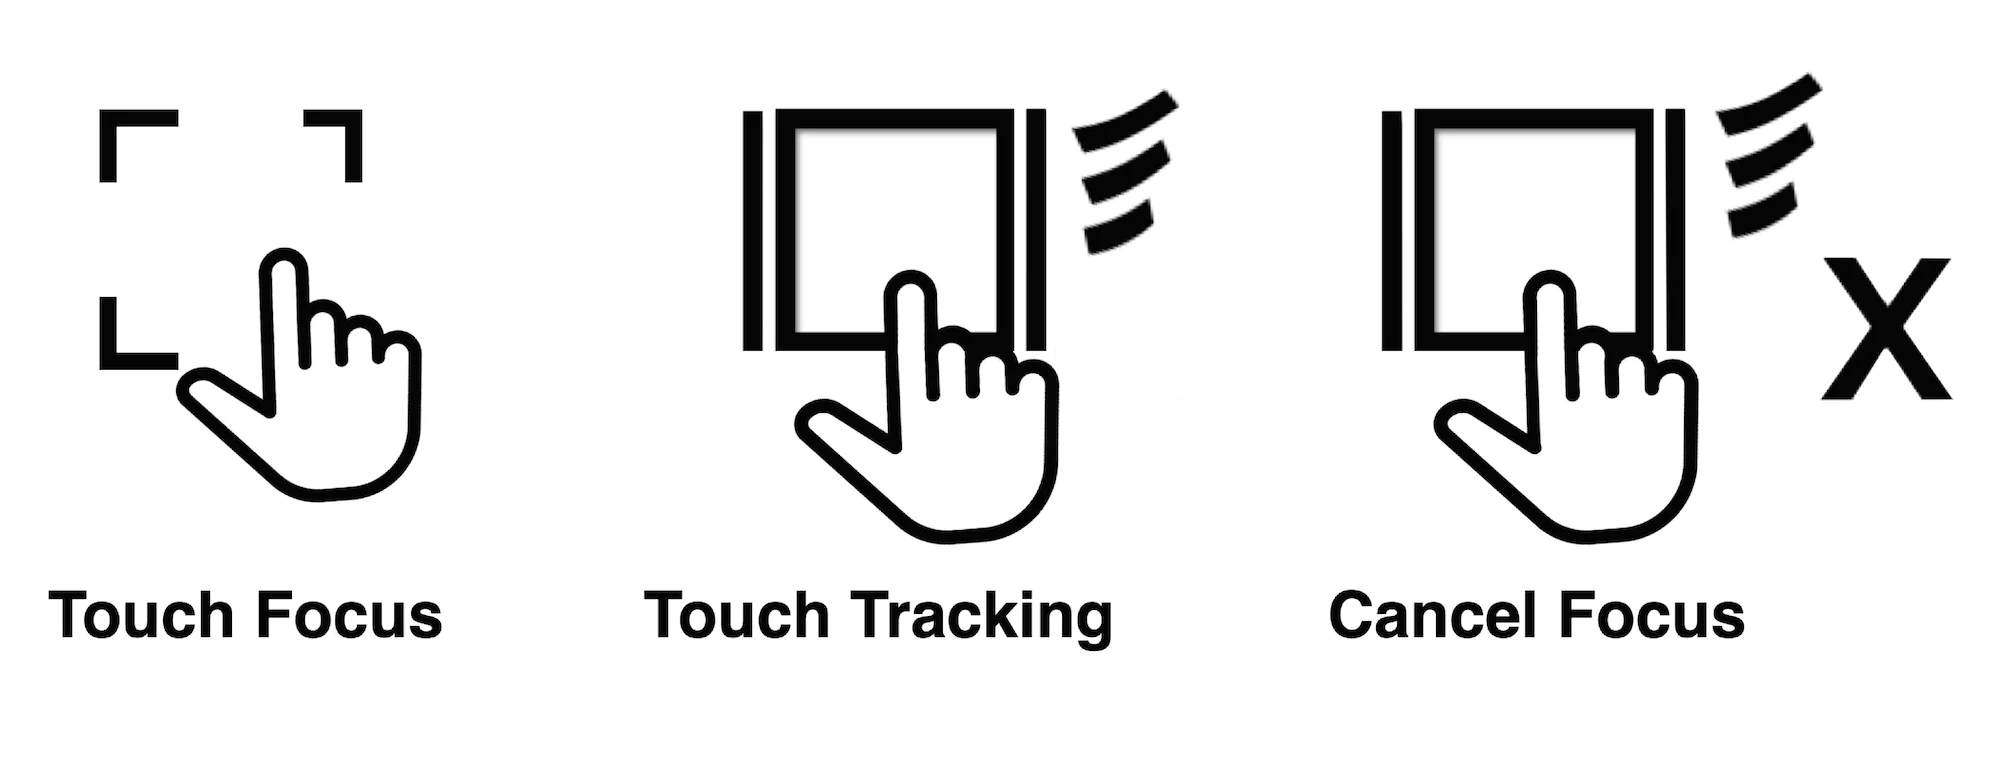
I recommend setting the Focus Mode to AF-C and Focus Area to Wide. With Touch Operation and Touch Tracking enabled you can then just touch and track your subject as it moves or change the ‘Touch Function in Shooting’ to Touch Focus when you want to pull focus between two subjects at different distances from the camera. Touch the Focus icon on the Monitor to cycle between Touch Focus, Touch Tracking and Touch Operation Off.
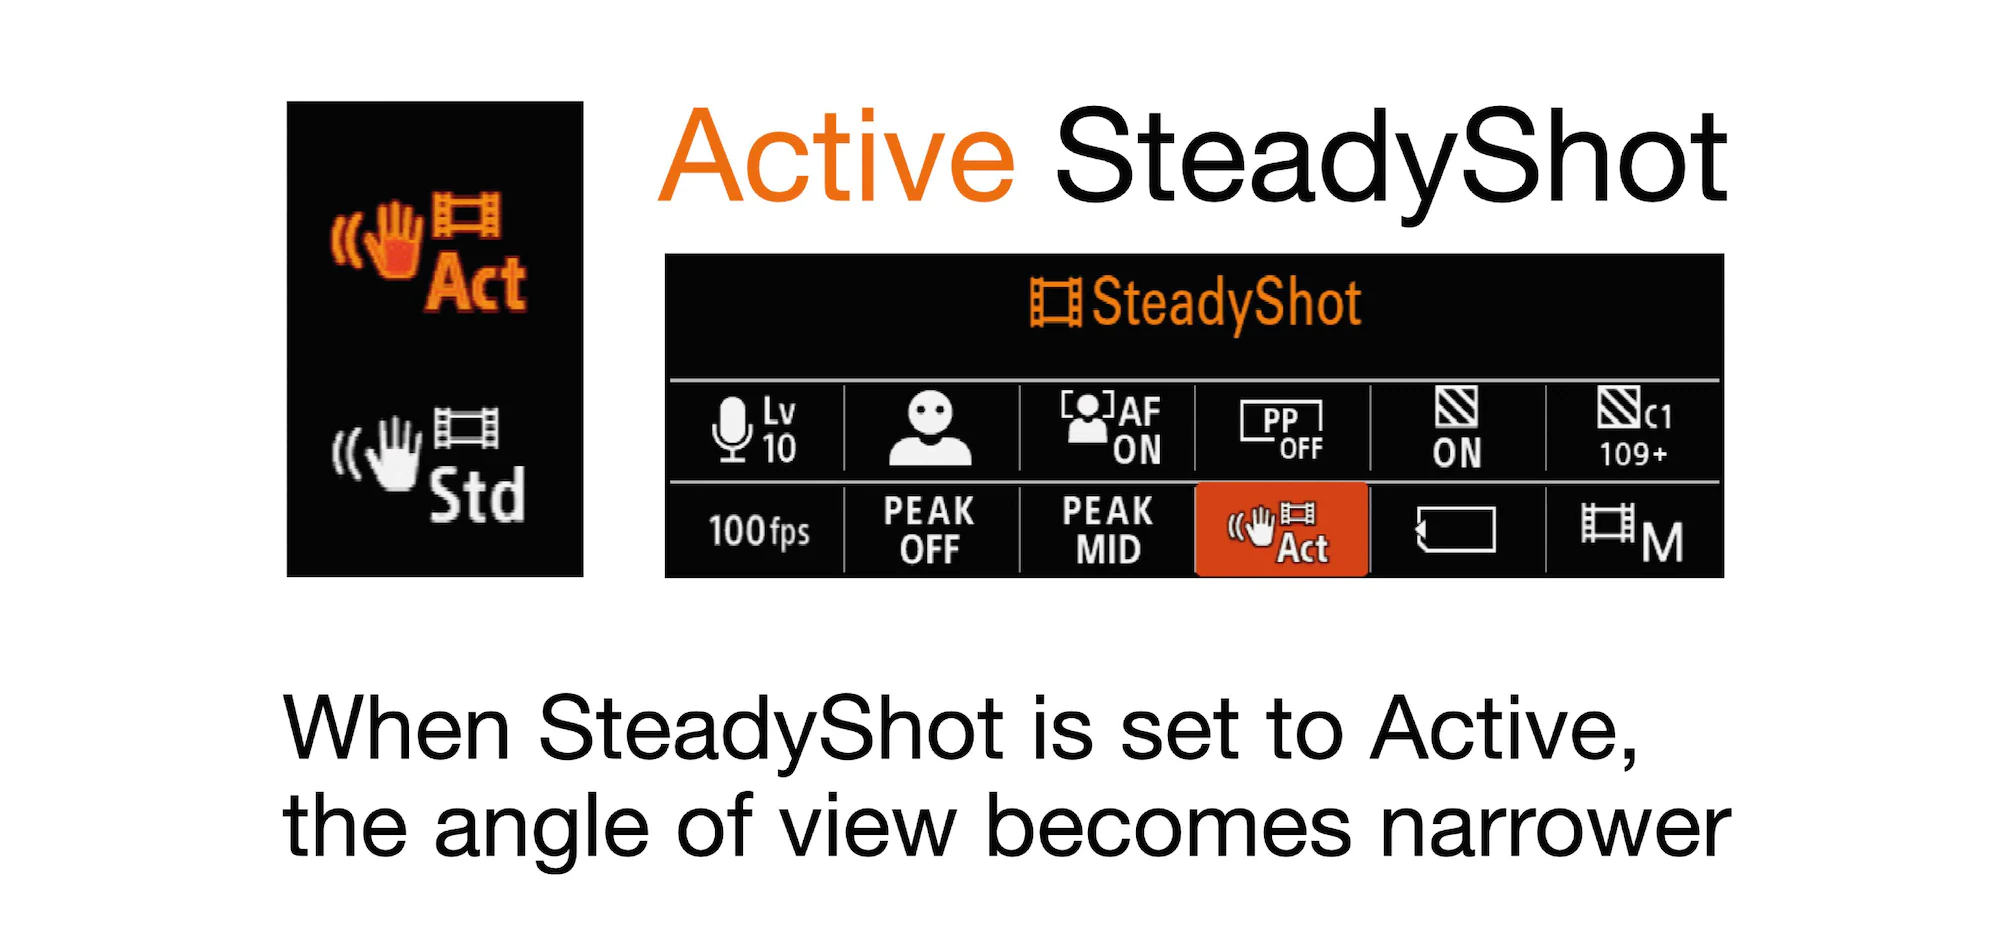
If you are intending to walk with the camera while recording movies, and you do not have the camera mounted on a gimbal, I strongly recommend switching SteadyShot to Active SteadyShot. The field of view will become slightly narrower, so you may need to zoom a little wider or attach a wider focal length prime.
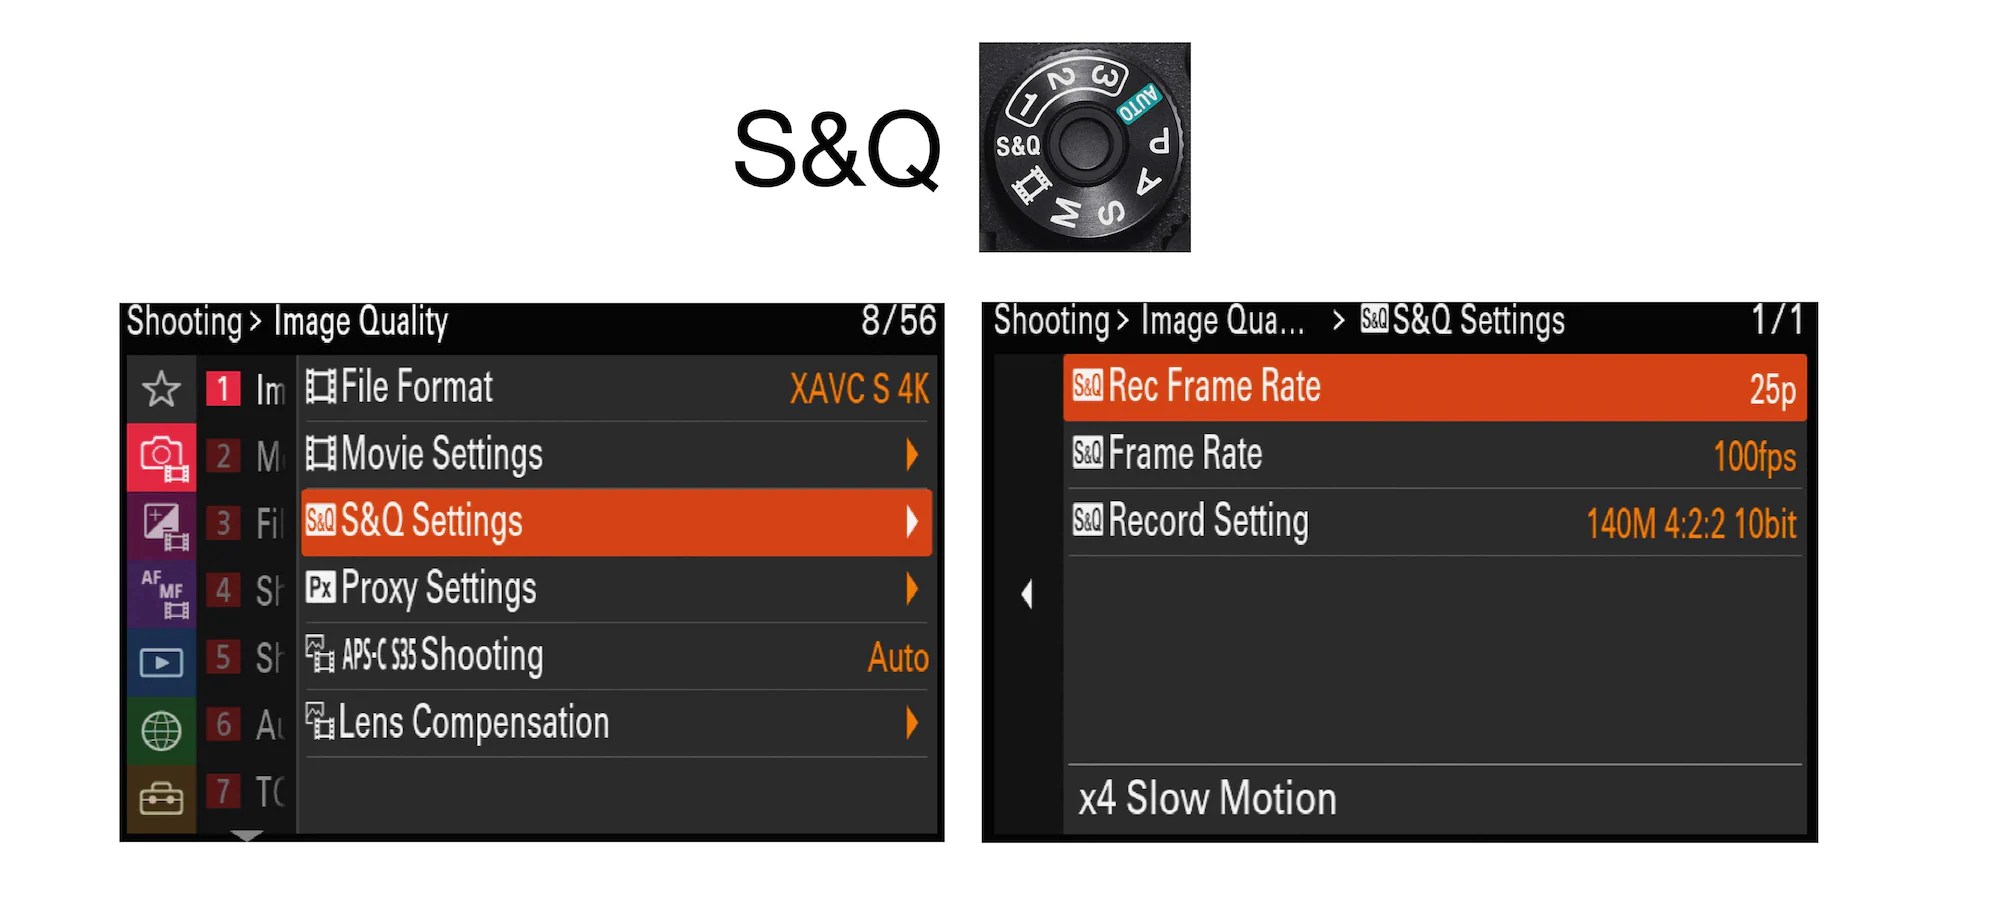
Recording movie clips that play back in slow motion is a quick and easy affair on an Alpha camera. Just set up the S&Q Settings (Shooting P1) with the faster frame rate (100fps for PAL and 120 fps for NTSC) and then the Record Setting 140M 4.2.2 10bit for maximum quality. Movies recorded with the S&Q Setting will automatically play back four times slower in your postproduction editing software. You can now simply turn the Shoot mode dial on the camera from Movies to S&Q when you need to record some slow-motion footage.
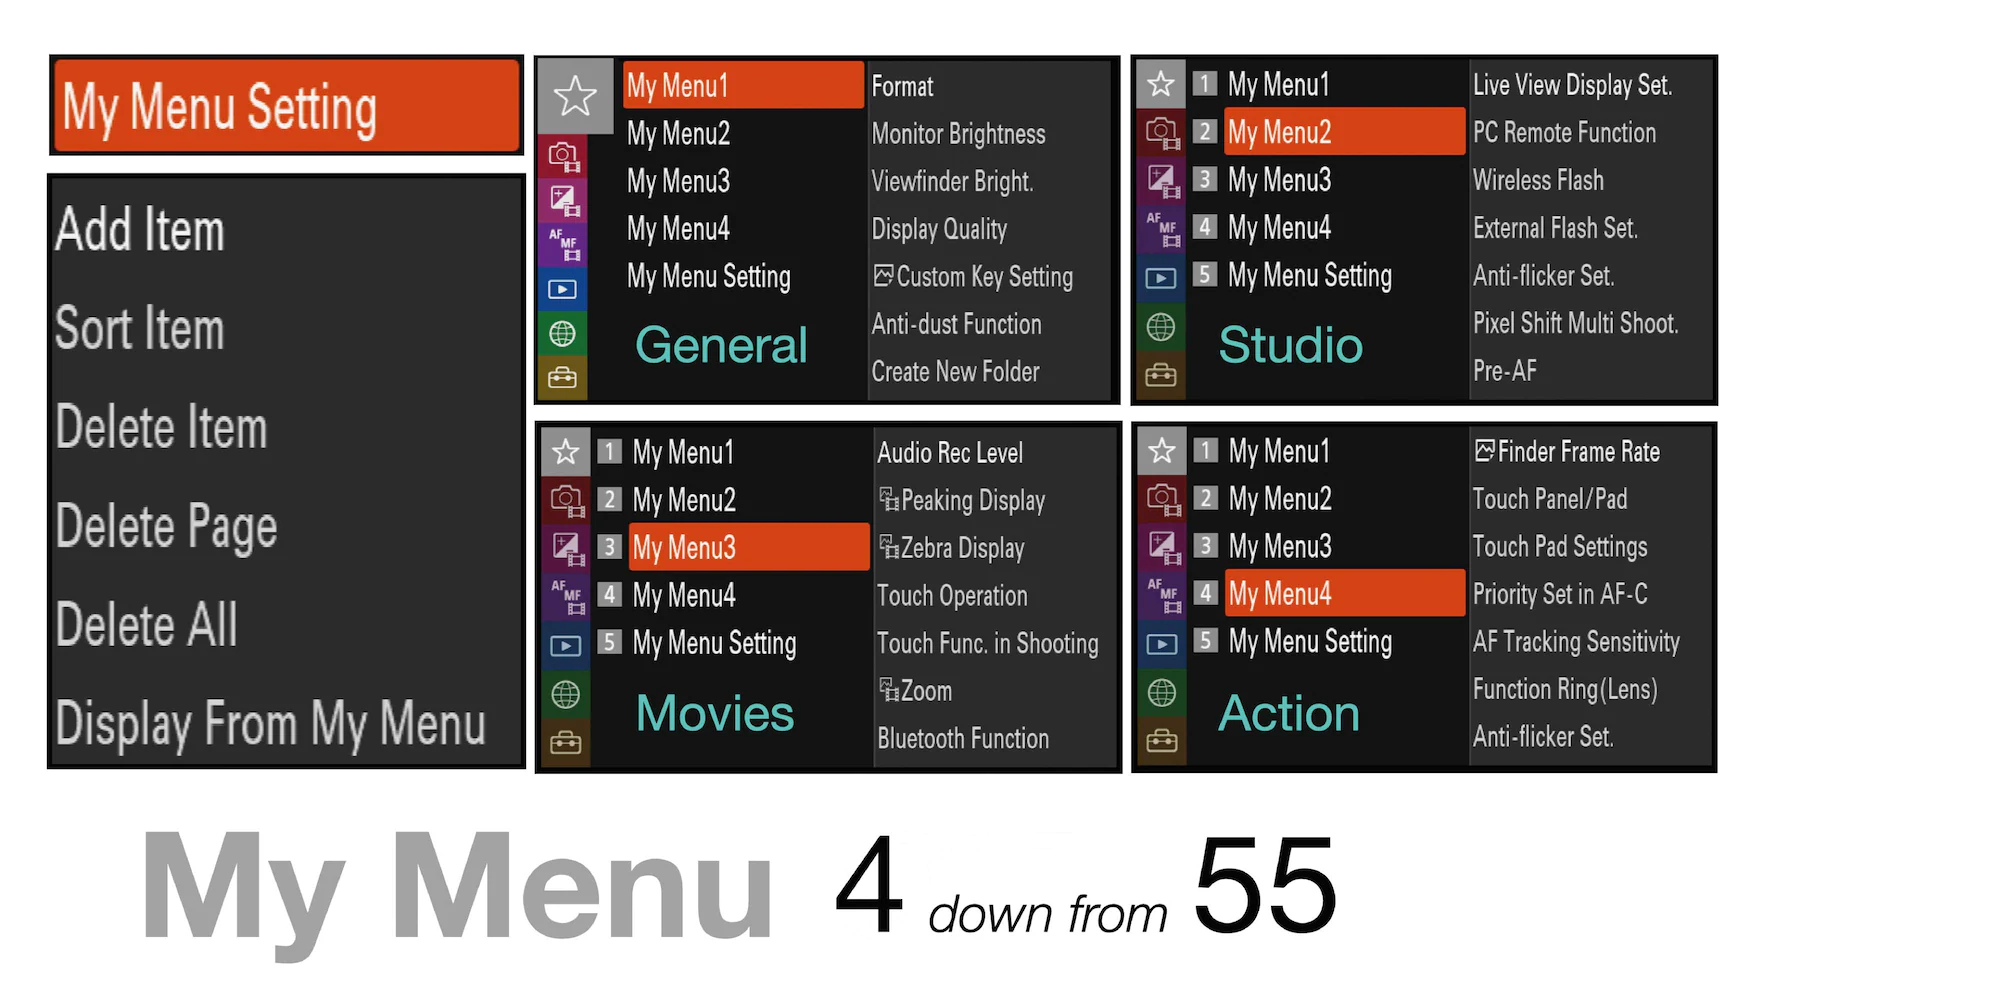
When you have completed all of the other setup procedures you may find yourself regularly looking for a setting. If you have spent too long looking for a menu option, I highly recommend adding that Menu item to the My Menu (Silver Star) tab. Over time you can organise these menu items on pages that makes sense to your own creative workflows. You can then assign a Custom Key to jump straight to My Menu instead of the main menus.

The final step in the Setup procedure is to go to Setup page 2 and Save all of your camera settings to a memory card. You can then archive these settings on your computer. This will ensure that if you ever have to Reset or Initialize your camera, or set up a second camera, it can be done in a just a few clicks. Note > The only Settings that are not saved with the CAMSET file are the Memories stored and then recalled on the Shoot Mode Dial. These can, however, also be transferred to a memory card using the M1-M4 settings when saving Memories.
For more information regarding setup, you can head over to my Patreon site where I offer Alpha training and consultancy services: https://www.patreon.com/markgaler
For review and training videos go to: https://www.youtube.com/c/AlphaCreativeSkills
For additional Alpha Learning Resources go to: www.markgaler.com
Disclaimer: The opinions expressed in this publication are those of the author. They do not reflect the opinions or views of Sony Asia Pacific.